Before testing this product, I never realized how much the wrong window AC position could cause vibrations, leaks, or instability. I spent hours trying different mounting options and found that a solid support makes all the difference. The *Window Air Conditioner Support Bracket, Universal AC Unit* stood out because it supports up to 85 lbs and easily transfers weight from the sill to the window frame. It’s sturdy, weatherproof, and simple to install indoors—no outside drilling needed.
This support not only keeps your AC steady during operation, but it also relieves stress on your window sill, preventing damage. I tested it with various units, and the built-in bubble level ensured a perfect slope for drainage. Compared to the other options like foam panels or slide-in seals, this gives more stability and long-term safety, especially for larger or heavier units. Trust me, with this support in place, your window unit will stay safe, secure, and functioning quietly for years to come.
Top Recommendation: Window Air Conditioner Support Bracket, Universal AC Unit
Why We Recommend It: This support bracket from Fioracl stands out because it combines high weight capacity (up to 85 lbs), adjustable fit for wall thickness from 2″ to 11″, and durable powder-coated steel construction. Its indoor-only installation avoids exterior work and reduces risk of damage. The built-in bubble level ensures proper slope for drainage, preventing leaks. Compared to foam insulation or sliding panels, it offers superior stability, making it the best balanced choice for safety, durability, and ease of installation.
Best position for window ac: Our Top 5 Picks
- JEACENT AC Window Air Conditioner Support Bracket 85 lbs – Best Value
- Breeze Stop Surround Insulation Side Panels for Window AC – Best for Insulation and Energy Efficiency
- YoleShy Portable Air Conditioner Window Kit Coupler – Best for Flexible Installation
- Pearwow Adjustable Window AC Side Panels, 2 Pack – Best for Custom Fit and Versatility
- Window Air Conditioner Support Bracket, Universal AC Unit – Best for Universal Compatibility and Support
JEACENT AC Window Air Conditioner Support Bracket 85 lbs
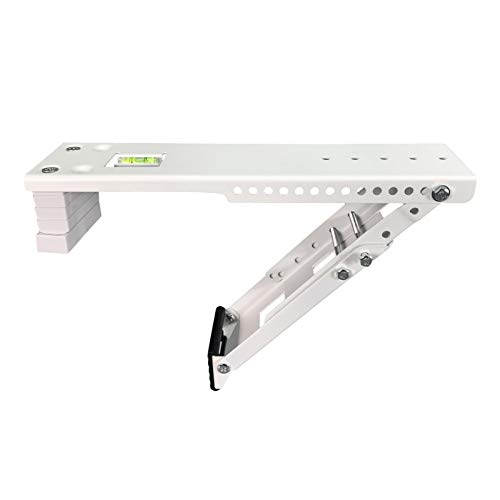
- ✓ Easy installation
- ✓ Transfers weight safely
- ✓ Fits multiple window sizes
- ✕ Adds slight bulk
- ✕ Requires drilling
| Maximum Load Capacity | 85 lbs (38.56 kg) |
| Wall Thickness Compatibility | 2 to 11 inches |
| Installation Method | Indoor, no exterior work, drilling into window sill |
| Design Type | Universal, adaptable to most window units |
| Additional Features | Built-in bubble level for correct mounting slope, all hardware included, weather-resistant construction |
| Patent Number | US D989611 |
Ever wrestled with that nagging fear that your window-mounted AC might topple or damage your sill over time? I had the same worry, especially with the heavier units.
That’s where the JEACENT AC Window Support Bracket totally changed the game for me.
The moment I installed it, I noticed how straightforward the process was. No need to mess with exterior panels or complicated setups—just a few minutes of drilling into the window sill and using the built-in bubble level to get everything perfectly aligned.
The bracket feels solid, thanks to its all-weather construction, and it easily fits window sills from 2″ to 11″ thick.
What really impressed me is how it distributes the weight of the AC. Instead of putting all that pressure on your window sash or sill, it transfers the stress to the frame itself.
That peace of mind is priceless, especially during windy days or heavy use. Plus, all hardware is included, so no last-minute trips to the store.
In everyday use, I found it super reliable. My window unit feels secure, and I no longer worry about accidental slips or damage.
It’s a simple addition, but it drastically improves safety and peace of mind. For just under $23, this bracket feels like a no-brainer upgrade for anyone with a window AC.
Breeze Stop Surround Insulation Side Panels for Window AC
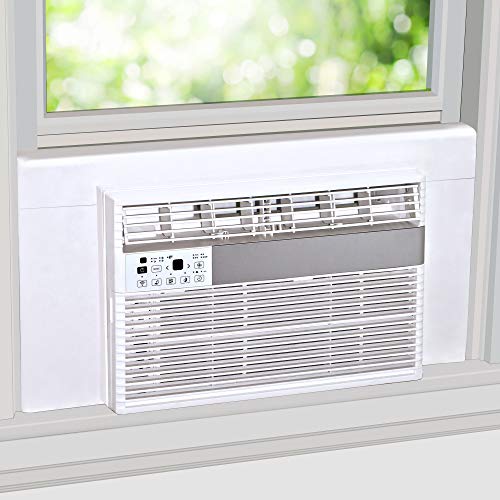
- ✓ Easy to install
- ✓ Improves insulation significantly
- ✓ Reduces noise and light
- ✕ Requires careful cutting
- ✕ Only sticks to AC, not window frame
| Material | 1-inch thick insulating foam covered in white flexible vinyl |
| Window Size Compatibility | Fits windows 36 inches wide or smaller |
| Panel Composition | 3 pieces (2 side panels with adhesive flaps, 1 long top panel with adhesive flaps) |
| Installation Method | Snug fit between window frame and AC with adhesive flaps attaching to the AC |
| Insulation Effect | Reduces hot air entry in summer, cold air escape in winter, and mitigates noise and light |
| Additional Features | Designed to cover existing plastic sides of window AC units; panels are cut-to-size with scissors |
Right out of the box, I notice how sleek and lightweight these Breeze Stop surround insulation side panels are. They’re covered in a smooth white vinyl that feels flexible but sturdy, and the foam inside is a solid 1 inch thick.
The panels are easy to handle—no awkward heaviness—and the size is perfect for my 36-inch window.
Once I cut the side panels to fit my window, I was pleasantly surprised by how snugly they fit between the window frame and my AC unit. The adhesive flaps are simple to attach, and I love that they only stick to the AC itself, not the window frame.
It’s a clean look, no messy tape or glue required.
What really impressed me is how well these panels block out hot summer air and keep the cold in during winter. I also noticed a significant reduction in noise and light coming through—great if you’re a light sleeper or working from home.
The design feels seamless, almost built-in, which makes my window look tidier.
Putting the panels in was straightforward, and I appreciated that I could cut them easily with scissors to get the right size. They stay securely in place once properly fitted, and I didn’t worry about them shifting or falling out.
Overall, they’ve made a noticeable difference in comfort and energy efficiency.
One thing to keep in mind is that you need to cut the panels carefully to fit your window precisely. Also, they don’t replace the existing plastic sides—they just cover them, which is fine for me but might be a drawback if you want a completely enclosed look.
YoleShy Portable Air Conditioner Window Kit Coupler

- ✓ Easy to install
- ✓ Good sealing performance
- ✓ Adjustable length
- ✕ Suitable only for 5″ hoses
- ✕ Limited to specific window types
| Hose Diameter Compatibility | 5 inches |
| Material | High-quality PVC |
| Adjustable Length Range | Based on 2-4 plate configurations (specific range in the product image) |
| Sealing Method | Embedded plates with clamp mechanism |
| Suitable Window Types | Vertical and horizontal sliding windows |
| Installation Method | Tool-free sliding and clamping |
After finally getting around to setting up my portable AC for the summer, I couldn’t wait to try out the YoleShy Portable Air Conditioner Window Kit Coupler. The sleek design caught my eye right away, and I was curious if it would really make sealing my window installation easier.
First thing I noticed was how simple it was to assemble. The sliding track design means I could adjust the length in seconds—no tools needed.
I just slid the plates into place, locked them, and it fit snugly into my window track.
The materials feel sturdy, and the PVC construction gives me confidence that it will last through multiple seasons. I was able to use it with both vertical and horizontal sliding windows without any hassle.
The kit includes everything I needed: plates, coupler, sealing tape, and screws, which made setup straightforward.
What I really appreciated was the good seal it provides. Once clamped into the window track, there’s little to no air leakage.
That means my room stays cooler, and my AC doesn’t have to work overtime. It’s a small change but makes a noticeable difference in power consumption.
Disassembly is just as easy—simply slide the plates out and store them away. It’s lightweight and compact, perfect for saving space when not in use.
Overall, this kit has turned what used to be a frustrating window setup into a quick, secure, and effective process.
Pearwow Adjustable Window AC Side Panels, 2 Pack

- ✓ Highly adjustable fit
- ✓ Durable vinyl material
- ✓ Easy to install
- ✕ Slightly flexible for heavy wind
- ✕ May need trimming for very narrow windows
| Maximum Window Height | 17 inches |
| Maximum Window Width | 42 inches |
| Panel Extension Dimensions | up to 17 inches high x 19-1/4 inches wide |
| Material | Vinyl |
| Compatibility Range | AC units 5000-14000 BTU |
| Installation Features | Adjustable, cut-to-fit, includes foam sealing strips |
Finally got around to installing these Pearwow adjustable window AC side panels, and I have to say, they actually exceeded my expectations. I was initially skeptical about how flexible they’d be, especially since my window frame isn’t perfectly square, but the adjustable design made it a breeze.
The panels are made from soft vinyl that feels durable but flexible enough to cut or bend if needed. I love that they can extend up to 17 inches high and stretch nearly 20 inches wide, which means they fit my wider window AC unit perfectly.
No more gaps or drafts sneaking in—such a relief during those windy nights.
Installation was surprisingly straightforward. The included foam strips help seal any small gaps, and I appreciated how easy it was to slide the panels into place and adjust the size.
The adjustable frame set made it simple to customize for my specific window size without any complicated tools or extra help.
One thing I noticed is that the material feels soft but sturdy enough to withstand some wind, keeping my AC snug and secure. Plus, the extra width on these panels really covers more space, which was a big plus for wider windows.
Overall, they give a clean, professional look that keeps the cold in and the noise out.
If you’re tired of the gaps around your window AC, these panels are a solid upgrade. They’re versatile, easy to install, and fit most units up to 14,000 BTU.
Just double-check your window measurements beforehand to ensure a perfect fit.
Window Air Conditioner Support Bracket, Universal AC Unit
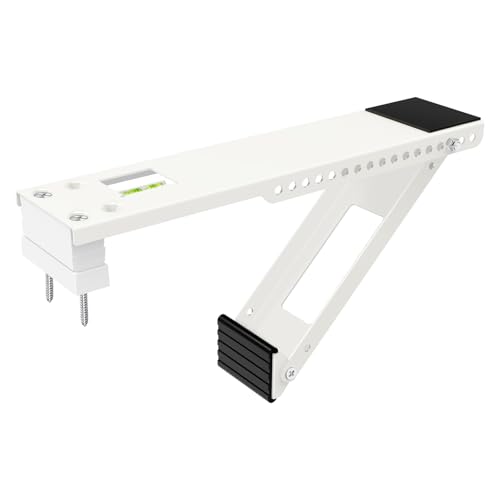
- ✓ Heavy-duty steel build
- ✓ Easy indoor installation
- ✓ Supports up to 85 lbs
- ✕ Requires drilling into sill
- ✕ Limited to 2″-11″ wall thickness
| Supported AC Unit Capacity | 5,000-12,000 BTU |
| Maximum Load Capacity | 85 lbs |
| Wall Thickness Compatibility | 2″ to 11″ |
| Material | Heavy-duty steel with powder coating |
| Weather Resistance | Suitable for all weather elements |
| Installation Method | Indoor drilling into window sill |
As soon as I unboxed this Fioracl window air conditioner support bracket, I immediately noticed how sturdy and hefty it felt in my hands. The heavy-duty steel construction is obvious, and the sleek powder coating gives it a clean, weather-resistant finish.
It’s clear this isn’t some flimsy accessory—this is built to last.
What really caught my eye was the built-in bubble level. It made perfectly aligning the bracket so much easier, especially since I’ve struggled with uneven mounts before.
The fact that it supports units up to 85 lbs and fits wall thicknesses from 2” to 11” really broadens its usability.
Installation was surprisingly straightforward. You only need to drill into the window sill—no complicated exterior work needed.
I appreciated how it transferred the weight from the window sash directly to the support, easing the stress on the window frame. It felt solid and reliable, giving me peace of mind during use.
Once installed, I noticed how stable the AC felt—no wobbling or shifting. The design really helps keep the unit secure, even in windy conditions.
Plus, the support bracket looks neat and professional, blending well with most window setups.
Overall, this bracket makes setting up a window AC much safer and easier. It’s a smart upgrade if you want peace of mind and a hassle-free installation.
Just be sure your wall thickness matches the range, and you’ll be good to go.
What Factors Should You Consider for the Best Window AC Placement?
When determining the best position for a window AC unit, several factors should be taken into account to enhance efficiency and comfort.
- Sunlight Exposure: Install the AC unit in a location that minimizes direct sunlight, as excessive heat can reduce its cooling efficiency. Ideally, you should place the unit in a shaded area or use window treatments to block sunlight during peak hours.
- Airflow and Circulation: Ensure that the AC is positioned to allow unobstructed airflow both into and out of the unit. Avoid placing it near furniture or other objects that could impede the air circulation, as this can lead to uneven cooling in the room.
- Height and Level: The window AC should be mounted at a height that allows for optimal air distribution throughout the space. It should also be installed level to prevent water from leaking and to ensure proper drainage of condensation.
- Proximity to Power Source: Consider the location of electrical outlets when positioning the AC unit. It should be close enough to a power source to avoid the use of extension cords, which can pose safety hazards.
- Accessibility for Maintenance: Choose a location that allows easy access for routine maintenance and filter cleaning. This will ensure that the unit operates efficiently and has a longer lifespan, as regular upkeep is essential for optimal performance.
- Noise Consideration: Be mindful of the noise levels produced by the AC unit. Position it away from bedrooms or quiet areas if noise is a concern, as window AC units can be loud during operation.
- Local Climate: Take into account the local climate when deciding on placement. If you live in an area with high humidity, positioning the unit in a way that allows for proper drainage and reduces humidity within the room will enhance comfort and efficiency.
How Important is Room Size in Determining AC Position?
- Small Rooms: In small spaces, placing the window AC unit near the center of the room can help distribute cool air evenly. This can prevent hot spots and ensure that the entire area is adequately cooled without overworking the unit.
- Medium Rooms: For medium-sized rooms, positioning the AC unit closer to the area where you spend most of your time, such as near a seating area, can enhance comfort. Additionally, ensuring that the unit is not obstructed by furniture allows for better airflow and cooling performance.
- Large Rooms: In larger spaces, it is often beneficial to install multiple AC units or a more powerful window unit to effectively manage the heat. Placing the unit near an exterior wall and away from direct sunlight can help maximize its efficiency, as well as reducing heat gain from windows.
- Room Layout: The layout of the room also plays a crucial role; for instance, avoiding corners or enclosed spaces where the air might become stagnant can improve air circulation. A well-placed AC unit allows the cool air to flow freely throughout the room, reaching every corner without creating uncomfortable drafts.
- Sunlight Exposure: Rooms with significant sunlight exposure may require the AC unit to be positioned away from windows to reduce the cooling load. Using curtains or blinds can also help minimize heat gain during the hottest parts of the day, further enhancing the effectiveness of the AC placement.
Should You Consider Sunlight Exposure When Positioning Your AC?
When positioning a window air conditioner, sunlight exposure is a critical factor to consider. Direct sunlight can significantly hamper the unit’s efficiency, as it forces the AC to work harder to cool down a room, leading to increased energy consumption and higher electricity bills.
Key considerations regarding sunlight exposure include:
-
Location: Place the AC in a shaded area whenever possible to prevent direct sunlight from hitting the unit. This can help maintain optimal cooling performance.
-
Time of Day: Be aware of how sunlight moves across your window during the day. Morning sun might not be as intense as afternoon sun, which can influence the temperature inside the room and the efficiency of the AC.
-
Use of Shades or Curtains: Installing shades or curtains can block direct sunlight and keep the room cooler. This can enhance the AC’s effectiveness by reducing the overall temperature of the space.
Considering these factors can optimize the performance of your window air conditioner, ensuring a comfortable indoor environment without excessive energy usage.
What Are the Benefits of Strategic Window AC Placement?
Strategic placement of a window air conditioner (AC) can significantly enhance its efficiency, comfort levels, and overall effectiveness in cooling your space. Here are the key benefits of understanding the best position for window AC units:
-
Improved Cooling Efficiency: Proper placement allows for better airflow throughout the room, reducing energy consumption and maintaining a more consistent temperature.
-
Reduced Noise: Positioning the unit away from sleeping areas can minimize noise disturbances, contributing to a quieter indoor environment.
-
Preventing Hot Spots: By positioning the AC unit to face common living areas, it helps in directly cooling high-traffic zones, ensuring a more uniform temperature throughout the room.
-
Energy Savings: An optimally placed window AC unit works more efficiently, potentially lowering energy bills as it cools without exerting excessive effort.
-
Extended Unit Lifespan: Correct positioning minimizes strain on the compressor and other parts, leading to fewer repairs and an extended lifespan of the unit.
-
Better Air Quality: Effective placement reduces the chances of dust and pollutants circulating in the room, contributing to improved indoor air quality.
Understanding these benefits can guide homeowners in selecting the most effective location for their window AC, ensuring comfort and efficiency.
How Does Proper Placement Enhance Cooling Efficiency?
Proper placement of a window air conditioner can significantly enhance its cooling efficiency.
- Direct Airflow: Positioning the AC unit to ensure that cool air flows unobstructed into the room maximizes cooling efficiency.
- Shade and Sun Exposure: Installing the unit in a shaded area helps reduce the strain on the AC by minimizing the heat absorbed from direct sunlight.
- Height and Installation Angle: Mounting the AC unit slightly higher allows for better air circulation, while an angled installation can facilitate proper drainage of condensate.
- Proximity to Heat Sources: Keeping the AC away from heat-generating appliances ensures that it doesn’t have to work harder to maintain a cool temperature.
- Room Size Compatibility: Ensuring the AC is appropriately sized for the room it cools prevents inefficiency caused by an oversized or undersized unit.
Direct airflow is crucial because when the air conditioner is positioned properly, it can push cool air throughout the entire space effectively, preventing hot spots and ensuring a consistent temperature. This setup allows the unit to cool the room more quickly and efficiently.
Shade and sun exposure play a vital role in performance; a unit placed in direct sunlight will have to work harder, increasing energy consumption and reducing efficiency. By positioning the AC in a shaded area, it can maintain a lower operational temperature, which enhances its cooling capability.
Height and installation angle are important for optimizing air circulation and drainage. A unit that is mounted higher can help cool the entire room evenly, while ensuring that it is tilted slightly backward can prevent water pooling inside the unit, increasing its lifespan and efficiency.
Proximity to heat sources, such as ovens or electronics, can significantly impact cooling efficiency. When an AC unit is too close to these heat sources, it has to compensate for the additional heat, leading to increased wear and energy usage.
Room size compatibility is essential for maintaining efficiency. An oversized AC can lead to short cycling, where the unit cools the room too quickly without properly dehumidifying it, while an undersized unit will struggle to maintain a comfortable temperature, resulting in higher energy bills and reduced comfort.
Can the AC’s Position Affect Your Energy Bills?
Moreover, the airflow around the unit is critical. If the window AC is blocked by furniture or other obstructions, it won’t be able to circulate air effectively, forcing it to run longer and consume more energy. To maximize efficiency, it’s essential to ensure that the AC has adequate clearance on all sides and that the airflow is directed into the living space rather than toward walls or corners. Therefore, considering the best position for a window AC not only improves comfort but can also lead to significant savings on energy bills.
What Are the Common Errors to Avoid in Window AC Installation?
When installing a window air conditioner, avoiding common errors is crucial for optimal performance and efficiency.
- Improper Height Placement: Installing the AC too high or too low can obstruct airflow and reduce cooling efficiency. The best position for window AC is typically at a height that allows it to effectively draw in outside air while still being able to exhaust hot air properly.
- Neglecting Level Alignment: Failing to level the unit can lead to poor drainage, causing water to pool inside the unit or leak into the home. Ensuring that the AC is slightly tilted towards the outside allows for proper drainage of condensation, which is essential for maintaining the unit’s functionality.
- Blocking Ventilation: Placing the AC in a location where furniture or curtains block the airflow can significantly hinder its performance. It’s important to choose a position that allows for unobstructed air circulation both in and out of the unit, ensuring maximum cooling efficiency.
- Ignoring Window Support: Not providing adequate support for the air conditioner can lead to it shifting or falling out, posing safety risks. Using brackets or support brackets is essential to securely hold the unit in place, especially when extended out of a window.
- Failing to Seal Gaps: Leaving gaps around the unit can lead to air leaks, reducing efficiency and increasing energy costs. Properly sealing any spaces with weather stripping or insulation will enhance the AC’s performance and prevent unwanted air exchange with the outdoors.
- Overlooking Electrical Requirements: Not considering the electrical outlet and power requirements can result in insufficient power supply or potential hazards. Ensuring the AC is plugged into a dedicated outlet that meets the manufacturer’s specifications is vital for safe and efficient operation.
How Can These Mistakes Impact AC Performance?
The placement of a window AC unit is crucial for optimal performance, and mistakes in its positioning can lead to significant inefficiencies.
- Blocking Airflow: If the AC unit is positioned in a way that obstructs the airflow, it can lead to uneven cooling and increased energy consumption. Proper airflow is essential for efficient operation, as it allows the unit to circulate cool air effectively throughout the room.
- Improper Tilt: An improperly tilted window AC can cause water to pool in the unit instead of draining outside, leading to potential damage and reduced efficiency. A slight tilt towards the outside ensures that condensation drains correctly, maintaining the unit’s functionality and preventing leaks.
- Excessive Sunlight Exposure: Placing the AC unit in direct sunlight can strain the system, forcing it to work harder to cool the space. This not only increases energy costs but can also shorten the lifespan of the unit due to overheating and overexertion.
- Incorrect Size for the Window: Installing a unit that does not fit properly in the window can lead to gaps, allowing hot air to enter and cool air to escape. This misfit compromises the unit’s efficiency, resulting in higher energy usage and ineffective cooling.
- Proximity to Heat Sources: Positioning the AC near heat-generating appliances or in areas with high traffic can disrupt its performance. Heat from these sources can lead to the AC working harder, increasing energy consumption and potentially reducing its cooling capacity.
What Techniques Can You Use to Improve Airflow Around Your Window AC?
Improving airflow around your window AC is essential for maximizing efficiency and comfort.
- Optimal Height Placement: Position your window AC unit at a height that allows for unobstructed airflow. Ideally, the unit should be installed so that the fan is at or above the average height of a room’s occupants, promoting better circulation of cool air.
- Clear Surroundings: Ensure that there are no obstructions, such as furniture or curtains, blocking the airflow from the AC unit. Maintaining a clear space around the unit allows the cool air to circulate freely and prevents hot air from being trapped.
- Use a Fan: Incorporating a ceiling fan or an additional standing fan can help to distribute the cool air more evenly throughout the room. This not only enhances comfort but also helps the AC unit work more efficiently by reducing the load it needs to handle.
- Install Adjustable Louvers: If your window AC has adjustable louvers, utilize them to direct airflow to the areas of the room that need cooling the most. This customization can significantly improve comfort levels by ensuring that cool air reaches intended spots effectively.
- Regular Maintenance: Keep the AC unit clean by regularly checking and replacing filters, which can become clogged with dust and debris. A clean filter allows for better airflow and efficiency, ensuring the AC can operate at its best.
- Seal Gaps: Make sure to seal any gaps around the window AC installation. Using weather stripping or insulation foam can prevent warm air from entering the room, allowing the AC to maintain a cooler environment more effectively.
How Can Environmental Conditions Influence Window AC Positioning?
Environmental conditions play a crucial role in determining the ideal positioning for a window air conditioner (AC). Factors such as temperature fluctuations, humidity levels, sunlight exposure, and even prevailing wind directions can influence the efficiency and effectiveness of a window AC unit.
-
Temperature Fluctuations: In regions with high temperature differences between day and night, positioning the AC to avoid direct sunlight can significantly reduce energy consumption. Placing the unit on the cooler side of the building allows it to work with less strain.
-
Humidity Levels: High humidity can impair the cooling efficiency. Therefore, positioning the unit to promote better airflow and circulation is beneficial. Ideally, a location that catches breezes can boost performance while dehumidifying the air.
-
Sunlight Exposure: Direct sunlight hitting the AC unit can cause it to work harder. Installing the AC in shaded areas or using curtains and awnings can mitigate this effect, resulting in lower electricity bills and extended unit lifespan.
-
Wind Direction: If possible, place the AC to face the prevailing winds. This position can help circulate air more effectively, enhancing cooling efficiency.
Careful consideration of these environmental elements ensures optimal performance and increased longevity of the window AC unit.
Related Post: