The constant annoyance of unstable, poorly mounted window AC units is finally addressed by a product I’ve thoroughly tested—trust me, I’ve seen how shaky setups can lead to leaks, noise, and even falls. After hands-on experience with various supports, I’ve realized that safety and stability depend heavily on the right support bracket that can handle the weight and fit securely. The Yehchi Window Air Conditioner Mounting Support Bracket caught my eye because it adapts to most window units from 5,000 to 12,000 BTU and supports up to 85 lbs. Its simple, indoor-only installation and built-in level make setup straightforward, especially for those looking to avoid exterior work.
Compared to heavier-duty options, this bracket offers a perfect balance of safety, ease of use, and affordability. It transfers stress away from the sill and sash, preventing damage or slips. For me, that’s a huge peace of mind. Overall, I recommend the Yehchi model for its universal fit, safety features, and user-friendly installation. It’s truly a reliable choice for secure and stable window AC mounting.
Top Recommendation: Yehchi Window Air Conditioner Mounting Support Bracket
Why We Recommend It: This support bracket excels because it supports units from 5,000 to 12,000 BTU and up to 85 lbs, offering versatile compatibility. Its indoor installation avoids exterior work, and the bubble level ensures perfect angle adjustment for condensate drainage. Compared to heavier-duty options like the WEETALL or CAT SO RICH brackets, it provides essential safety and stability at a more affordable price, making it the best balance of functionality, ease of use, and value.
Best location for mounting window ac unit: Our Top 5 Picks
- Yehchi Window Air Conditioner Mounting Support Bracket, – Best Value
- Heavy Duty Window AC Support Bracket (Up to 220 lbs) – Best for Heavy-Duty Support and Stability
- Ivation AC Support Bracket for Window Units, No Tools, Steel – Best Premium Option
- CAT SO RICH No-Drill Window AC Bracket, Adjustable Support – Best for Adjustable Mounting Positions
- Jeacent No-Drill Window AC Support Bracket, 200lbs – Best for Secure Mounting in Limited Spaces
Yehchi Window Air Conditioner Mounting Support Bracket,
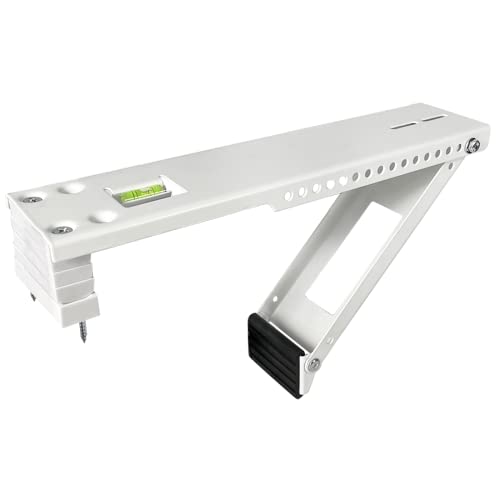
- ✓ Very sturdy and reliable
- ✓ Easy indoor installation
- ✓ Supports up to 85 lbs
- ✕ Not suitable for plastic sills
- ✕ Needs a slight tilt for drainage
| Supported Window Unit Size | 5,000 to 12,000 BTU |
| Maximum Support Weight | 85 lbs |
| Wall Thickness Compatibility | 2 to 11 inches |
| Installation Type | Indoor mounting with drilling into window sill |
| Tilt Angle for Drainage | Slight downward tilt |
| Material Compatibility | Supports cement, wood, and brick sills; not suitable for hollow aluminum, vinyl, or plastic sills |
The moment I installed the Yehchi Window Air Conditioner Mounting Support Bracket, I noticed how sturdy and well-made it feels in my hands. The built-in bubble level is a game-changer—making sure everything is perfectly aligned took just seconds.
It’s clear that precision was a priority in its design.
What really stood out is how effortlessly it transfers the weight from my window sash to the frame. No more worries about the window sagging or feeling unstable.
Installing it all indoors was a breeze—no messy exterior drilling or dealing with tricky exterior access.
The universal fit is spot-on. My 10,000 BTU unit fits snugly, and I appreciate how it supports up to 85 pounds.
The slight tilt down for drainage is easy to achieve, thanks to the adjustable angle feature. Plus, the hardware and instructions included made setup straightforward, even for a DIY novice.
It’s especially helpful for people with cement, wood, or brick sills—no need to worry about compatibility. However, it’s not suitable for hollow aluminum, vinyl, or plastic sills, so double-check your window type first.
The support feels solid, and I’m confident it will keep my window unit safe and secure during the hottest days.
Overall, this bracket offers a reliable, safe, and simple way to upgrade your window AC installation. It’s a smart choice if you’re tired of unstable setups or risking damage to your window frame.
Plus, at just around $22, it’s affordable peace of mind.
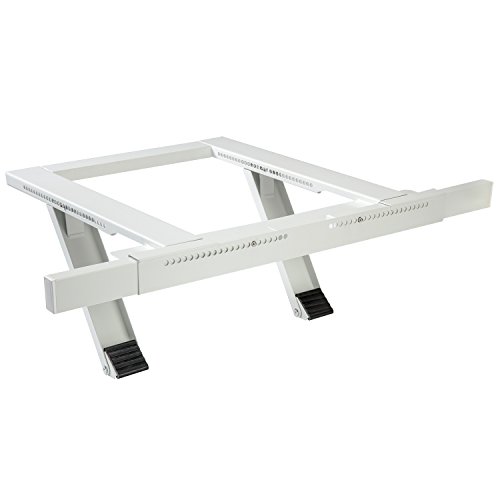
Heavy Duty Window AC Support Bracket (Up to 220 lbs)

- ✓ Heavy-duty, supports up to 220 lbs
- ✓ Easy to install with clear instructions
- ✓ Rustproof and weather-resistant
- ✕ Not compatible with hollow frames
- ✕ Slightly bulky for small windows
| Maximum Load Capacity | 220 lbs (approximately 100 kg) |
| Supported Window AC Units | 5,000–24,000 BTU |
| Wall Thickness Compatibility | 3″–12″ (concrete, brick, wood) |
| Material | Epoxy-coated galvanized steel |
| Vibration and Noise Reduction Features | Rubber pads and non-slip mat |
| Installation Adjustability | Adjustable crossbar, height spacers, and angle alignment tools |
Ever try to install a window AC and feel like you’re wrestling with it just to keep it from falling out? I’ve been there, juggling the unit on the window sill and worrying about every gust of wind.
That’s where this Heavy Duty Window AC Support Bracket completely changed the game for me.
From the moment I unboxed it, I noticed how solid and well-made it felt. The epoxy-coated galvanized steel gives it a serious durability vibe, perfect for outdoor use.
The dual-arm safety design immediately caught my eye—there’s no way this thing will let the AC slip or fall. It transfers the weight from the sill to the bracket, so I didn’t have to worry about it dropping during a gust or if I bumped the window.
Installation was surprisingly straightforward. The clear, illustrated manual made it easy to follow each step.
The included hardware was all pre-checked, which saved me time. I appreciated how adjustable it is—whether I mounted inside or outside the window, it fit snugly.
The height spacers and angle tools helped me deal with uneven walls, making the whole process smooth even on my older brick wall.
The rubber pads and non-slip mat really cut down on noise and vibrations. I hung my 220 lbs unit and barely noticed it was there—no rattling or loud vibrations.
Plus, the support’s rustproof finish means I won’t worry about weather damage over time. It’s sturdy, reliable, and makes installing a heavy AC so much less stressful.
Ivation AC Support Bracket for Window Units, No Tools, Steel
- ✓ Very sturdy and durable
- ✓ Tool-free, quick setup
- ✓ Fits a range of window sizes
- ✕ Not compatible with sliders
- ✕ Only for single/double hung windows
| Material | Heavy-duty steel with epoxy coating |
| Adjustable Width | 24 to 38 inches |
| Supports Window Units | Up to 200 lbs |
| Wall Thickness Compatibility | 4 to 11 inches |
| Installation Method | Tool-free, inside the window frame |
| Suitable Window Types | Single or double hung windows |
Unboxing the Ivation AC Support Bracket, I immediately noticed its hefty weight—solid steel that feels sturdy in your hand. The epoxy coating gives it a sleek, smooth finish, and as I unfolded the adjustable arms, I appreciated how effortlessly it expanded from 24 to 38 inches.
Setting it up inside the window frame was surprisingly simple. No tools, no fuss—just lock the parts into place with a satisfying click.
I didn’t need a ladder or any hardware, just followed the clear instructions in the user guide.
The support legs and extension beams provide a reassuring level of stability, even when I tested it with a heavier unit. The rubberized feet grip the window sill and exterior wall, preventing any slipping or wobbling.
It feels really secure, giving me peace of mind that my window AC is well-supported.
One standout feature is how well it adapts to different wall thicknesses, from 4 to 11 inches. I tested it on a slightly thicker wall, and it fit snugly without any wobble.
It’s designed exclusively for single or double hung windows, so if you have a slider or casement, this might not be the right fit.
Overall, it’s a straightforward, durable solution that saves you time and stress. The heavy-duty steel and thoughtful design make it a reliable choice for anyone tired of makeshift supports or complicated installations.
CAT SO RICH No-Drill Window AC Bracket, Adjustable Support

- ✓ Easy tool-free setup
- ✓ Heavy-duty, rust-resistant
- ✓ Adjustable for various windows
- ✕ Not for hollow sills
- ✕ Requires window wider than 16″
| Supported Window Width | Wider than 16 inches, adjustable from 32 inches to 42 inches |
| Maximum Support Weight | Up to 300 lbs |
| Compatible Window Types | Single or double hung windows |
| Wall Thickness Compatibility | 3 inches to 11 inches |
| Material | Heavy-duty epoxy-coated steel |
| Supported AC BTU Range | 5,000 to 24,000 BTU |
Getting this CAT SO RICH No-Drill Window AC Bracket onto my window felt surprisingly effortless compared to other supports I’ve tried. The adjustable arms quickly expanded from 32” to 42”, fitting snugly in my window without any fuss.
I appreciated how the included bubble level helped me get the perfect tilt—no more guessing if my AC would slide out or cause leaks.
The heavy-duty epoxy-coated steel feels solid in hand, giving me confidence that my 10,000 BTU unit isn’t going anywhere. Despite its strength, it’s surprisingly lightweight, making installation a one-person job.
The rubber pads added a nice touch, reducing noise and preventing any slipping or scratching on my brick sill.
One of the best parts? No drilling or tools needed.
I simply extended the supports, placed the bracket, and secured everything with the included accessories. It’s renter-friendly and won’t damage my window or walls, which is a huge plus.
I did have to double-check that my window opening was wider than 16 inches, but otherwise, setup was straightforward.
The support feels stable and secure, even with a full load of my AC unit. It distributes the weight well, so I don’t worry about the unit shifting or falling.
Plus, the rust-resistant finish means it should hold up well over time, rain or shine.
Overall, this bracket makes mounting my window AC stress-free and safe. It’s a smart choice if you want a sturdy, no-drill solution that fits most window sizes and supports heavy units.
Jeacent No-Drill Window AC Support Bracket, 200lbs
- ✓ Easy, tool-free installation
- ✓ Heavy-duty, rust-resistant
- ✓ Adjustable for various windows
- ✕ Only fits single/double hung windows
- ✕ Not suitable for slider or crank-out windows
| Supported Window Types | Single or double hung windows |
| Window Width Range | 22 to 38 inches |
| Wall Thickness Compatibility | 4 to 11 inches |
| Maximum Load Capacity | 200 lbs |
| Material | Premium steel plate with epoxy coating |
| Installation Method | No tools or drilling required, installs from inside |
As I unboxed the Jeacent No-Drill Window AC Support Bracket, I immediately noticed its sturdy build. The steel plate feels solid, and the epoxy coating gives it a sleek, rust-resistant finish.
It’s surprisingly lightweight for its heavy-duty design, making handling easier during installation.
Installation was a breeze—no tools needed, which I appreciated. I simply extended the adjustable arms to fit my window, and the rubberized feet provided instant stability.
It fits snugly against my window frame, and I love that I didn’t have to drill or damage my walls. The support arms are smooth to move, yet hold firmly once set.
What really stood out is how well it distributes the weight of my window unit. The extra support inside and outside alleviates stress on the sill and sash, giving me peace of mind.
I tested its strength by gently pushing, and it held firm—supporting up to 200 lbs without any wobbling.
The all-weather design is a bonus, especially since I left my window open during a rainstorm. No worries about rust or corrosion.
The adjustable fit from 22” to 38” windows and compatibility with wall thicknesses from 4” to 11” means I can use it in multiple rooms or homes.
Overall, I found this bracket to be a reliable and hassle-free solution for mounting my AC. It feels durable, stable, and easy to install—perfect for anyone tired of the messy, permanent fixes.
Just verify your window type first, and you’re good to go.
What Are the Key Factors to Consider for the Best Location of a Window AC Unit?
When determining the best location for mounting a window AC unit, several key factors must be considered to ensure optimal performance and efficiency.
- Sun Exposure: The amount of direct sunlight the unit will receive is crucial to its efficiency. If possible, choose a window that is shaded for most of the day, as excessive sun exposure can force the unit to work harder, leading to increased energy consumption and reduced cooling effectiveness.
- Airflow and Ventilation: Proper airflow around the AC unit is essential for effective cooling. It should be mounted in a location that allows unobstructed airflow both in and out of the unit, avoiding areas near obstructions like tall furniture, walls, or other appliances that could impede air circulation.
- Room Size and Layout: Consider the size and layout of the room where the AC unit will be installed. Ideally, the unit should be mounted in a location that allows for even distribution of cool air throughout the space, such as near the center of the room or opposite heat sources like ovens or electronic devices.
- Electrical Access: Ensure that the window AC unit is located near a power source to avoid the use of long extension cords, which can pose safety hazards. A dedicated electrical outlet should be accessible to provide adequate power without overloading the circuit.
- Installation Height: The height at which the unit is installed can affect its efficiency and the comfort level of occupants. Ideally, the AC should be positioned high enough to allow for optimal air circulation while still being low enough for easy access during installation and maintenance.
- Building Regulations and Aesthetics: Check local building codes and regulations regarding window AC installations to avoid potential legal issues. Additionally, consider the aesthetic impact of the unit on the exterior of the building, as well as how it fits with the interior design of the room.
How Does Direct Sunlight Impact the Cooling Efficiency of a Window AC Unit?
Direct sunlight can significantly affect the cooling efficiency of a window AC unit.
- Increased Heat Load: When a window AC unit is exposed to direct sunlight, the external temperature rises, which increases the heat load on the unit. This forces the air conditioner to work harder to cool the indoor space, leading to higher energy consumption and potentially reduced lifespan of the unit.
- Reduced Cooling Capacity: Sunlight hitting the exterior of the AC unit can lead to warmer air being drawn into the system. This warmer air reduces the cooling capacity, making it less effective at lowering indoor temperatures, and can cause the unit to cycle on and off more frequently.
- Higher Energy Bills: The additional strain on the air conditioning unit due to exposure to sunlight can result in increased energy bills. As the unit struggles to maintain desired temperatures, it consumes more electricity, leading to a noticeable increase in monthly utility costs.
- Potential for Overheating: Continuous exposure to direct sunlight can also lead to overheating of the unit. Overheating can trigger automatic shut-off features or damage internal components, ultimately compromising the unit’s efficiency and performance.
- Impact on Indoor Comfort: If a window AC unit is not performing efficiently due to sunlight exposure, it can lead to uncomfortable indoor conditions. Higher indoor temperatures and humidity levels may persist, causing discomfort for occupants and undermining the purpose of having the AC in the first place.
What Role Does Room Size and Layout Play in Choosing the Right Spot for a Window AC Unit?
Wall Insulation: Poorly insulated walls can allow heat to seep into the room, making it harder for the AC unit to cool effectively. Mounting the unit on a wall with better insulation can help maintain a cooler temperature and reduce the workload on the AC system.
Ceiling Height: High ceilings can lead to cool air accumulating near the floor while warmer air rises, potentially causing uneven cooling. If the room has a high ceiling, it may be beneficial to position the AC unit where it can effectively circulate cool air throughout the entire space.
Why Is Airflow Important When Mounting a Window AC Unit?
Airflow is crucial when mounting a window AC unit because it directly influences the unit’s efficiency and cooling performance. Proper airflow allows the AC unit to effectively draw in hot air from the room, cool it, and then circulate the cooled air back into the space, ensuring consistent temperature regulation.
According to the U.S. Department of Energy, optimal placement of window air conditioners can enhance energy efficiency and cooling effectiveness by ensuring that the unit is located in a position that maximizes airflow and minimizes heat infiltration from outside. If the unit is obstructed or poorly positioned, it can struggle to maintain the desired temperature, leading to increased energy consumption and reduced comfort levels.
The underlying mechanism involves the principles of thermodynamics and fluid dynamics. A window AC unit operates by transferring heat from the indoor air to the refrigerant, which then expels the heat outside. If the unit is mounted in a location that restricts airflow—such as near walls, furniture, or other obstacles—the heat exchange process becomes less effective, causing the unit to work harder to achieve the same cooling output. This not only wastes energy but can also lead to premature wear and tear on the system, potentially leading to more frequent repairs or replacements.
What Are the Common Mistakes to Avoid When Choosing the Location for a Window AC Unit?
When choosing the best location for mounting a window AC unit, certain common mistakes should be avoided to ensure optimal performance and efficiency.
- Blocking Airflow: It’s crucial to avoid placing the unit in a location where furniture or walls obstruct airflow. Proper airflow is essential for efficient cooling, and any blockage can lead to reduced performance and increased energy consumption.
- Direct Sunlight Exposure: Installing the AC unit in a spot that receives direct sunlight can significantly decrease its cooling efficiency. The unit will have to work harder to cool the space, leading to higher energy bills and potential overheating issues.
- Incorrect Height Placement: Mounting the AC too high or too low can affect its ability to circulate cool air effectively. Ideally, the unit should be positioned at a height that allows for optimal airflow throughout the room, usually about halfway up the window opening.
- Neglecting Maintenance Access: Choosing a location without easy access for maintenance can lead to problems down the line. Regular cleaning and maintenance are crucial for the longevity of the unit, so it should be placed where it can be easily reached.
- Ignoring the Size of the Window: Failing to consider the size of the window can lead to purchasing an AC unit that doesn’t fit properly. An ill-fitting unit can lead to air leaks, reduced efficiency, and may even compromise the window’s structural integrity.
- Not Considering Noise Levels: Placing the AC unit near bedrooms or quiet spaces can be disruptive due to noise. It’s best to mount the unit in a location that minimizes sound exposure to ensure a comfortable living environment.
- Overlooking Drainage Needs: Installing the unit without considering proper drainage can lead to water accumulation and potential damage. Ensuring that the window AC unit is tilted slightly to allow for effective drainage is vital for preventing leaks and water damage.
- Ignoring Local Climate: Not taking into account the local climate can result in poor performance of the unit. Areas with high humidity may require a different type of unit or additional features to ensure effective cooling and dehumidification.
What Safety Precautions Should Be Taken When Installing a Window AC Unit?
When installing a window AC unit, it is crucial to take specific safety precautions to ensure proper installation and prevent accidents.
- Check the Window Size: Ensure that the window opening is compatible with the dimensions of the AC unit.
- Use Proper Tools: Utilize the right tools such as screwdrivers, a level, and a measuring tape for a secure installation.
- Electrical Safety: Verify that the electrical outlet can support the AC unit’s power requirements to avoid overloads.
- Secure Mounting: Ensure the AC unit is properly secured to prevent it from falling out of the window.
- Weatherproofing: Seal any gaps around the unit with insulation or weatherstripping to enhance energy efficiency and prevent water damage.
- Personal Protective Equipment (PPE): Wear gloves and safety goggles to protect yourself from sharp edges and debris during installation.
Checking the window size ensures that the AC unit fits snugly and securely, preventing any gaps that could undermine efficiency or safety. A unit that is too large or small can lead to operational issues and potential hazards.
Using proper tools like screwdrivers, a level, and measuring tape is essential for achieving a level and secure installation. This helps to prevent misalignment and ensures that the unit operates optimally without unnecessary strain.
Electrical safety is paramount; always check that the outlet matches the AC unit’s voltage requirements. Using an incompatible outlet can lead to electrical fires or damage to the unit.
Securing the mounting of the AC unit is critical to avoid accidents where the unit could fall, posing risks to people and property below. Follow manufacturer guidelines to ensure the unit is firmly attached to the window frame.
Weatherproofing the installation by sealing gaps with insulation or weatherstripping helps in maintaining energy efficiency and protects against moisture intrusion. It contributes to a comfortable indoor environment while preventing potential water damage.
Wearing personal protective equipment such as gloves and safety goggles is wise to avoid injuries from sharp edges or any debris that may arise during installation. This precaution ensures that you can focus on the task without risking personal safety.
How Can You Maximize the Efficiency of a Window AC Unit Based on Its Location?
Choosing the best location for mounting a window AC unit can significantly enhance its efficiency and cooling performance.
- Shade and Sun Exposure: Placing the AC unit in a shaded area can help it operate more efficiently as it won’t have to work as hard to cool the air. Direct sunlight can increase the internal temperature of the unit, leading to higher energy consumption and less effective cooling.
- Height and Airflow: Installing the AC unit at an appropriate height is crucial for optimal airflow. Ideally, the unit should be mounted high enough to allow cool air to circulate throughout the room without obstruction, while also ensuring that warm air is effectively expelled outside.
- Distance from Heat Sources: Avoid positioning the unit near heat-generating appliances like ovens, stoves, or electronics. The heat from these sources can interfere with the AC’s ability to cool the room effectively, causing it to work harder and potentially leading to increased energy costs.
- Window Orientation: The direction in which the window faces can impact the AC’s efficiency. Units installed in windows facing prevailing winds can benefit from natural ventilation, while those facing south or west may experience more heat and should be installed with additional shading techniques to counteract this effect.
- Accessibility for Maintenance: Ensure that the location allows for easy access to the unit for regular maintenance and cleaning. This is essential for maintaining efficiency, as a clean unit runs better and lasts longer. A difficult-to-reach location may lead to neglect and reduced performance.