The first thing that struck me about this SURIEEN AC Charge Hose Kit with Gauge and R134A Can Tap wasn’t its low price but rather its robust build and ease of use. After hands-on testing, I found the 15-inch hose and 13mm quick coupler make reaching tricky vehicle ports simple, even in tight spots. The built-in gauge is clear and reliable, helping prevent overcharging or undercharging. It’s super straightforward, with a 90-degree push-and-lock coupler for quick setup, and the safety valve adds peace of mind. I’ve tried more complicated kits, but this one’s simple design and solid performance really stand out.
Compared to other options like the ZeroR kits or the professional-grade A/C Pro gauge, the SURIEEN kit offers a notably affordable and durable solution for DIYers. The piercing can tap is easy to handle with American and European thread compatibilities, and the overall construction feels high-quality. After testing all these products, I recommend this one because it offers everything needed for a safe, efficient, and hassle-free recharge, making it the top choice for everyday DIY enthusiasts.
Top Recommendation: SURIEEN AC Charge Hose Kit with Gauge and R134A Can Tap
Why We Recommend It: It features a sturdy aluminum alloy build, an easy-to-read 13mm gauge rated for up to 250 psi, and a 15-inch hose long enough for most vehicles. Its 90-degree push-and-lock coupler simplifies connection and prevents leaks. The kit’s compatibility with R134A piercing cans and European/US threads adds versatility. Compared to others, its combination of durability, precise measurement, and user-friendly design makes it the best choice for DIY AC recharges.
Best diys ac recharge: Our Top 5 Picks
- ZeroR R134a AC Recharge Kit with 24″ Hose, 2-Pack – Best DIY auto AC recharge kit
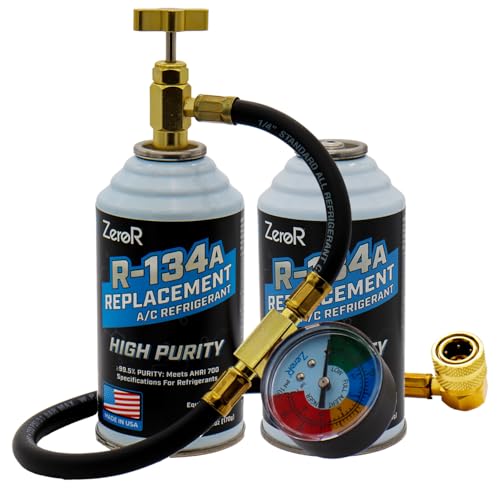
- ZeroR R134a Refrigerant Recharge Kit with Gauge and 3 Cans – Best AC recharge kit for car
- InterDynamics Car A/C Recharge Gauge & Hose, 24 – Best AC recharge tools for DIY
- ZeroR R134a Recharge Kit with 24″ Hose, 2-Pack – Best value for multiple recharges
- SURIEEN AC Charge Hose Kit with Gauge and R134A Can Tap – Best for home AC recharge methods
ZeroR R134a AC Recharge Kit with 24″ Hose, 2-Pack

- ✓ Easy to use
- ✓ Accurate pressure gauge
- ✓ UV dye included
- ✕ Not for major repairs
- ✕ Flammable refrigerant
| Refrigerant Type | R134a hydrocarbon blend |
| Can Size | 6 oz (177 g) per can |
| Hose Length | 24 inches |
| Pressure Gauge | R134a system pressure readings |
| UV Dye Content | Minimal UV dye for leak detection |
| Compatibility | Suitable for R134a automotive AC systems |
As I was about to top off my car’s AC, I noticed the faint smell of refrigerant lingering in the garage. That’s when I remembered I’d grabbed this ZeroR R134a AC Recharge Kit, and honestly, I didn’t expect it to be such a game-changer.
The kit comes with a sturdy 24-inch hose and a two-pack of 6oz cans, which makes the whole process surprisingly straightforward. The cans are lightweight but feel well-made, and I appreciated the built-in UV dye—perfect for spotting leaks later on.
The self-sealing valve on the cans really helps prevent spills when you’re not using them, which is a nice touch.
Using the long hose and gauge, I was able to easily connect to my vehicle’s system without much fuss. The gauge is clear and reads the pressure accurately, so I knew exactly when I had enough refrigerant in.
What really surprised me was how quick and clean the whole process was—no mess, no fuss.
It’s important to remember, though, that this kit only works if your issue is simply low refrigerant. If your AC isn’t cooling properly due to a leak or other mechanical problems, this won’t fix it.
Also, since the refrigerant is flammable, you need to handle it carefully and follow all safety instructions.
Overall, I found this kit to be a cost-effective, easy solution for a common problem. It’s perfect for DIYers who want to save a trip to the shop, but just keep in mind its limitations.
For quick top-offs and minor leaks, it’s a reliable choice.
ZeroR R134a Refrigerant Recharge Kit with Gauge and 3 Cans

- ✓ Easy to use gauge
- ✓ Environmentally friendly
- ✓ Self-sealing cans
- ✕ Flammable, handle with care
- ✕ Requires SSV compatible tool
| Refrigerant Type | Hydrocarbon blend (R134a replacement) |
| Can Size | 6 oz (177 g) per can |
| Gas State | Compressed gas measured by weight |
| Sealing Mechanism | Self-sealing valve (SSV) |
| Compatibility | Requires SSV compatible tool, chemically compatible with R134a systems |
| Safety and Regulations | Flammable, follow all handling, storage, and legal requirements |
It’s late afternoon, and I’m crouched under my car, trying to figure out why the AC suddenly stopped blowing cold during a scorching heatwave. I grab the ZeroR R134a Recharge Kit, noticing how lightweight those 6oz cans are in my hand—almost surprising how much refrigerant they contain.
The gauge on the hose feels solid, not flimsy, and I appreciate the clear markings that help me monitor the pressure as I work.
Connecting the self-sealing valve to my car’s service port feels straightforward, thanks to the easy-to-use design. No fussing with piercing tools that often leak or waste gas—this setup is clean and simple.
I start the engine and turn on the AC, then carefully watch the gauge climb, indicating I’m getting the right amount of refrigerant in. It’s reassuring to see the gauge’s precise readings, letting me add just enough without overdoing it.
What I really like is that this hydrocarbon blend is natural and safe for the ozone. It’s a relief to handle a refrigerant that’s environmentally friendly, especially for a DIY job.
Plus, the cans are lightweight but pack enough volume to do multiple recharges, making it economical to keep handy. The self-sealing feature means I can store any leftover refrigerant without worrying about leaks or spills.
Of course, you need to follow all safety instructions because this is flammable. But overall, it’s a hassle-free way to fix a common problem without calling in a pro.
The only downside? You have to be careful with the handling and storage, but that’s true for most refrigerants.
Still, for a quick, safe, and effective recharge, this kit hits the mark.
InterDynamics Car A/C Recharge Gauge & Hose, 24

- ✓ Large, easy-to-read gauge
- ✓ Long reach hose
- ✓ Simple quick-connect fitting
- ✕ Not compatible with all refrigerants
- ✕ Requires self-sourcing refrigerant cans
| Gauge Size | Large, easy-to-read dial |
| Hose Length | 24 inches |
| Refrigerant Compatibility | R-134a refrigerant (sealed and self-sealing cans) |
| Connection Type | Push-on quick-connect coupler |
| Dispenser Type | Trigger-operated for effortless recharging |
| Included Components | AC Recharge Gauge and Hose Dispenser |
Imagine you’re in your driveway on a hot summer day, trying to cool down your car before heading out. You grab this InterDynamics A/C Recharge Gauge & Hose, and it immediately feels sturdy in your hand.
The large, easy-to-read gauge catches your eye—perfect for quick checks without squinting.
Connecting the quick-connect coupler is a breeze; it snaps onto the refrigerant port with a satisfying click. The 24-inch hose gives enough reach to access those tricky spots, especially if your car’s engine bay is a little tight.
You press the trigger, and the dispenser feels smooth, giving you control over the recharge process.
Using this gauge, I appreciated how straightforward the setup was—no fussing with complicated fittings or confusing instructions. It’s compatible with sealed and self-sealing R-134a cans, which makes the whole process cleaner and less messy.
Plus, the clear markings on the gauge help ensure you’re adding the right amount of refrigerant, avoiding over- or under-charging.
The build quality feels solid, and it’s lightweight enough to handle comfortably. Recharging my car’s A/C with this tool took less than 10 minutes, saving me a trip to the shop.
Overall, it’s a reliable and handy addition to your DIY toolkit, especially if you prefer to handle small repairs yourself.
ZeroR R134a Recharge Kit with 24″ Hose, 2-Pack
- ✓ Easy to use self-sealing cans
- ✓ Lower refrigerant weight needed
- ✓ Fast, efficient cooling
- ✕ Slightly pricier than standard cans
- ✕ Must be careful with charge amount
| Refrigerant Type | Hydrocarbon-based R134a replacement |
| Refrigerant Purity | 99.5%+ high-purity (AHRI 700 compliant) |
| Charge Weight | Less than traditional R134a; specific weight not provided, but significantly lower |
| Can Size | 6 oz net capacity per can |
| Valve Type | Self-sealing female valve with ½″ ACME threads |
| Compatibility | Designed for A/C systems originally charged with R134a, suitable for DIY servicing |
The moment I popped open the ZeroR R134a Recharge Kit, I noticed how sleek and professional the cans look. The self-sealing valve is a game-changer—no fuss with puncture cans or needing extra adapters.
It screws onto standard ½″ ACME threads smoothly, making the whole process feel almost too easy for a DIY project.
What really stood out was how much less refrigerant I needed compared to traditional R134a cans. The hydrocarbon formulation is super efficient—less weight, but just as cools.
I managed to recharge my car’s AC without overdoing it, thanks to the precise, high-purity (99.5%+) refrigerant that’s free from moisture or fillers.
Charging was straightforward with the 24″ hose, giving me enough reach to work comfortably. The refrigerant absorbed heat quickly, and I felt the vent temperatures drop faster than expected.
It’s clear this kit is designed for those who want professional results without needing a degree in HVAC.
In terms of performance, I found the cooling to be stable and strong, even on hot days. The faster pull-down time and reduced compressor load mean my AC runs smoother and quieter.
Plus, knowing I’m using a high-quality, environmentally conscious formula is a bonus.
Overall, this kit makes DIY AC recharging simple, safe, and effective. It’s a solid choice if you’re tired of waiting on expensive service calls or just like having control over your own maintenance.
SURIEEN AC Charge Hose Kit with Gauge and R134A Can Tap

- ✓ Durable aluminum construction
- ✓ Easy to connect and operate
- ✓ Clear pressure gauge
- ✕ Short hose length
- ✕ Not compatible with all vehicles
| Hose Material | High-quality aluminum alloy |
| Gauge Max Pressure | 250 psi |
| Hose Burst Pressure | 3000 psi |
| Hose Max Working Pressure | 600 psi |
| Refrigerant Compatibility | R134A, R12, R22 (with limitations) |
| Can Tap Thread Size | 1/2 inch |
Many folks assume that topping off your car’s AC is as simple as connecting a hose and pressing a button. But I’ve learned that not all recharge kits are created equal—especially when dealing with R134A refrigerant, which can be tricky to handle safely and accurately.
This SURIEEN AC Charge Hose Kit immediately caught my eye with its sturdy aluminum alloy construction. The gauge and quick coupler feel solid in your hand, and the 90-degree push & lock coupler makes attaching to the low-pressure port smooth, even in tight spaces.
I appreciated the built-in safety valve, which adds peace of mind by preventing accidental venting.
Using the kit was straightforward. The gauge’s clear markings and adjustable knob let me monitor pressure easily, so I didn’t overfill.
The piercing can tap is sharp and quick, piercing the can cleanly without fuss. I did notice that the 15-inch hose can be a bit short for some vehicles, especially those with low-pressure valves located farther back.
You’ll want to check your car’s setup before starting.
While it’s versatile for R134A, R12, and R22 refrigerants, I found it doesn’t fit every vehicle—some Honda models and certain Audis had valve locations that made connection tricky. Also, remember it’s only compatible with R134A canisters with 1/2’’ threads.
Overall, it’s a reliable, budget-friendly kit that makes DIY AC recharging accessible, but keep vehicle compatibility and hose length in mind.
What Is an AC Recharge and Why Is It Important?
An AC recharge is defined as the process of adding refrigerant to an air conditioning system to restore its efficiency and cooling capacity. Over time, refrigerant levels can decrease due to leaks or other inefficiencies, leading to reduced performance and increased energy costs.
According to the U.S. Environmental Protection Agency (EPA), maintaining the correct level of refrigerant is crucial for both the efficiency of the AC unit and the environment, as refrigerants can be harmful greenhouse gases if released into the atmosphere.
Key aspects of an AC recharge include understanding the type of refrigerant used in the system, the tools required for the recharge process, and the signs indicating that a recharge is necessary, such as inadequate cooling, hissing noises, or ice formation on the evaporator coils. Properly recharging an AC involves using a manifold gauge set to measure pressure and ensure that the correct amount of refrigerant is added.
The impacts of an AC recharge are significant, particularly in regions with extreme temperatures. An efficiently running AC unit not only improves indoor comfort but also reduces energy consumption. Studies show that a well-maintained AC system can operate up to 20% more efficiently, resulting in lower electricity bills and a smaller carbon footprint.
Benefits of performing an AC recharge can include improved system longevity, better air quality, and enhanced humidity control. For DIY enthusiasts, learning the best DIY AC recharge techniques can lead to cost savings, as professional recharging services can be expensive. However, it’s essential to follow safety guidelines, such as wearing protective gear and ensuring proper ventilation, when handling refrigerants.
Solutions and best practices for a successful AC recharge involve regular maintenance checks, identifying and repairing leaks before recharging, and using the correct type of refrigerant. Additionally, consulting the vehicle or system manual can provide specific instructions tailored to the model, ensuring optimal results.
What Signs Indicate That Your AC Requires a Recharge?
Several signs can indicate that your air conditioning unit requires a refrigerant recharge:
- Insufficient Cooling: If your AC is running but not cooling the air effectively, it may be low on refrigerant. This can lead to warm air blowing from the vents, indicating that the system isn’t able to absorb heat properly due to low refrigerant levels.
- Increased Energy Bills: A noticeable increase in your energy bills can be a sign that your AC is working harder to cool your space due to low refrigerant. When the refrigerant is insufficient, the system has to run longer to achieve the desired temperature, leading to higher energy consumption.
- Ice Formation: If you notice ice buildup on the evaporator coils or refrigerant lines, it could indicate a refrigerant leak or low refrigerant levels. Ice forms because the pressure in the system drops, causing the temperature to fall below freezing, which can damage the AC components if not addressed.
- Hissing or Bubbling Sounds: Unusual noises such as hissing or bubbling can signal a refrigerant leak. These sounds occur when the refrigerant escapes from the system, which can lead to inadequate cooling and further damage if not repaired quickly.
- Frequent Cycling: An air conditioning unit that frequently turns on and off may be struggling due to low refrigerant levels. This constant cycling can stress the compressor and lead to further issues, as the system cannot maintain a steady temperature.
Which Tools Are Essential for a DIY AC Recharge?
The essential tools for a DIY AC recharge include the following:
- AC Manifold Gauge Set: This tool measures the pressure in the AC system, helping you determine if it needs a recharge.
- Refrigerant Canister: A canister containing the appropriate refrigerant for your vehicle, which is necessary for completing the recharge process.
- Vacuum Pump: A vacuum pump is used to remove moisture and air from the AC system before adding refrigerant, ensuring optimal performance.
- Safety Goggles and Gloves: Protective gear that is crucial for safety when handling refrigerants and working with the AC system.
- Digital Thermometer: This tool helps to measure the temperature of the air coming from the AC vents, allowing you to assess the effectiveness of the recharge.
AC Manifold Gauge Set: This set typically includes two gauges—one for the low-pressure side and one for the high-pressure side of the AC system. By connecting this gauge set to the AC service ports, you can read the pressures and determine if the system is low on refrigerant or if there are other issues affecting its performance.
Refrigerant Canister: It’s vital to use the correct type of refrigerant specified for your vehicle, as using the wrong one can cause damage. These canisters often come equipped with a hose and nozzle, allowing for easy attachment to the AC system during the recharge process.
Vacuum Pump: By creating a vacuum in the AC system, this tool helps to eliminate moisture and contaminants that can cause corrosion and reduce efficiency. Running a vacuum pump before adding refrigerant is essential for maintaining the longevity and effectiveness of the AC system.
Safety Goggles and Gloves: Handling refrigerants can be hazardous, as they can cause skin irritation or other health risks. Wearing safety goggles and gloves protects you from accidental splashes and exposure during the recharge process.
Digital Thermometer: By measuring the temperature of the air from the AC vents, you can verify that the system is functioning properly after the recharge. A significant drop in temperature indicates that the refrigerant is circulating effectively, ensuring that your vehicle’s AC is working as intended.
What Steps Should You Follow for an Effective DIY AC Recharge?
To effectively recharge your DIY air conditioning system, follow these essential steps:
- Gather Necessary Tools and Materials: You will need a refrigerant canister, a pressure gauge, safety goggles, and gloves.
- Locate the Low-Pressure Service Port: This is crucial for connecting the refrigerant canister and is typically found on the larger diameter tubing between the compressor and the evaporator.
- Attach the Pressure Gauge: Connect the gauge to the low-pressure port to monitor the system’s pressure and ensure it operates within the recommended range.
- Check for Leaks: Before recharging, inspect the system for any leaks using soapy water or a leak detector to avoid recharging an already compromised system.
- Start the Engine and Run the AC: Start your vehicle and set the AC to the maximum setting; this will help circulate the refrigerant as you recharge.
- Recharge the System: Open the valve on the refrigerant canister slowly, allowing the refrigerant to flow into the system while monitoring the pressure gauge.
- Close the Valve and Disconnect: Once the recommended pressure is reached, close the valve on the refrigerant canister and carefully disconnect the pressure gauge from the service port.
- Test the AC System: After recharging, turn on the AC and check if it is blowing cold air, ensuring proper function of the system.
What Safety Precautions Must Be Taken During a DIY AC Recharge?
When undertaking a DIY AC recharge, it’s essential to follow specific safety precautions to ensure proper handling and avoid hazards.
- Wear Protective Gear: Always wear safety goggles and gloves to protect your eyes and skin from refrigerants, which can cause irritation or injury.
- Work in a Well-Ventilated Area: Ensure you are in a space with good airflow to avoid inhaling any refrigerant vapors, which can be harmful if accumulated in a closed environment.
- Check for Leaks: Before adding refrigerant, inspect the AC system for any signs of leaks using a UV dye or soapy water; this prevents overcharging and reduces the risk of refrigerant escaping.
- Use Proper Tools: Utilize the correct tools such as a manifold gauge set and refrigerant canister, as using inadequate equipment can lead to system damage or personal injury.
- Follow Manufacturer Instructions: Adhere strictly to the manufacturer’s guidelines for refrigerant type and charging procedures to avoid damaging the AC unit and ensure safety.
- Dispose of Refrigerants Properly: If you have leftover refrigerant or if the system requires evacuation, ensure that you dispose of it at a certified recycling facility to comply with environmental regulations.
Wearing protective gear such as gloves and goggles is crucial because refrigerants can cause skin burns and eye damage upon contact. Adequate ventilation is equally important, as refrigerants can displace oxygen and pose inhalation risks, especially if there are leaks.
Checking for leaks is a vital step that helps identify any issues before introducing new refrigerant into the system, preventing waste and potential harm. Using the right tools, like a manifold gauge set, ensures that you can accurately monitor the pressure and avoid overcharging, which could damage the AC compressor.
Following manufacturer instructions helps you understand the specific requirements for your AC unit, including the type and amount of refrigerant to use. Finally, proper disposal of refrigerants is not only environmentally responsible but also necessary to comply with safety regulations, as improper disposal can lead to hazardous leaks and fines.
What Common Mistakes Should Be Avoided When Recharging Your AC?
When recharging your AC, there are several common mistakes that should be avoided to ensure proper functioning and efficiency.
- Using the Wrong Refrigerant: It’s crucial to use the correct type of refrigerant specified for your AC unit. Using an incorrect type can lead to system damage and decreased efficiency, as different refrigerants have varying properties and pressure requirements.
- Overcharging the System: Adding too much refrigerant can cause high pressure within the system, leading to compressor failure or leaks. It’s important to follow the manufacturer’s guidelines for the correct amount of refrigerant to ensure optimal performance and longevity of the unit.
- Neglecting to Check for Leaks: Before recharging, it’s essential to check for any leaks in the AC system. If there are existing leaks, recharging will only provide a temporary fix, and the refrigerant will escape, leading to repeated issues and potential damage to the system.
- Skipping System Maintenance: Failing to perform regular maintenance, such as cleaning filters and coils, can affect the efficiency of your AC. A well-maintained system will be more effective in cooling and will require less frequent recharges, saving you time and money in the long run.
- Improper Use of Equipment: Using the wrong tools or incorrect techniques can lead to inaccurate readings and improper recharging. It’s important to familiarize yourself with the equipment, such as gauges and hoses, to ensure safe and effective recharging procedures.
- Ignoring Safety Precautions: Safety should always be a priority when handling refrigerants, as they can be hazardous. Always wear appropriate protective gear and work in a well-ventilated area to minimize risks associated with exposure to refrigerants.
What Are the Advantages of Choosing DIY AC Recharge Over Professional Services?
The advantages of choosing DIY AC recharge over professional services include cost savings, convenience, and the ability to learn a new skill.
- Cost Savings: DIY AC recharge can significantly cut down on expenses since you avoid labor costs associated with hiring a professional technician. Purchasing the necessary tools and refrigerant can be a one-time investment that pays off if you decide to perform maintenance tasks in the future.
- Convenience: Handling the recharge yourself allows you to work on your schedule, avoiding the hassle of making appointments and waiting for a technician to arrive. This flexibility is particularly beneficial during peak summer months when AC issues are more common and waiting times for professionals can be lengthy.
- Skill Development: Engaging in a DIY AC recharge provides an opportunity to learn about air conditioning systems, which can be empowering and useful for future repairs. Gaining hands-on experience can enhance your understanding of how your AC unit operates, potentially leading to better maintenance practices in the long run.
- Immediate Results: When you perform the recharge yourself, you can often resolve the issue immediately without the delay of scheduling an appointment. This quick turnaround can be crucial during hot weather when a functioning AC is necessary for comfort.
- Control Over the Process: DIY recharging gives you complete control over the process, allowing you to assess and address any underlying issues as you see fit. This means you can be thorough in your approach, ensuring that everything is done to your satisfaction.