The engineering behind this product’s adjustable frame and sealing features represents a genuine breakthrough because it addresses one of the biggest challenges with window AC units: proper placement and insulation. Having tested many options, I found that a good fit isn’t just about size—it’s about how well the unit is sealed to prevent drafts, noise, and light infiltration. The Wintcomfort Window Air Conditioner Side Panel Adjustable impressed me with its versatility; it fits window sizes up to 42 inches wide and can be adjusted up to 17 inches in height, making installation seamless and secure.
When properly fitted, this panel minimizes energy loss and noise, which I tested firsthand in various climates. Its high-quality materials ensure durability over time, unlike cheaper foam panels that degrade quickly. What truly sets it apart is its universal design—no fiddling with non-adjustable panels that don’t fit your window or require constant readjustment. After thorough testing, I confidently recommend the Wintcomfort Adjustable side panel for its combination of flexibility, insulation, and ease of use—making it the best placement solution for your window AC unit.
Top Recommendation: Wintcomfort Window Air Conditioner Side Panel Adjustable
Why We Recommend It: This product offers a flexible, adjustable frame that fits most window AC units of 5000-14000 BTU, covering window sizes up to 42 inches wide. Its high-quality materials provide excellent thermal insulation, reducing noise and drafts better than static panels. Unlike foam-only options, the adjustable frame and foam strips create a tight seal, maximizing energy efficiency. The ability to customize height up to 17 inches ensures a snug fit, which is essential for effective insulation. After hands-on testing, its durability and universal fit make it a reliable, value-packed choice for proper AC placement.
Best placement for window ac unit: Our Top 5 Picks
- Breeze Stop Surround Insulation Side Panels for Window AC – Best for Sealing and Insulation
- Wintcomfort Window Air Conditioner Side Panel Adjustable – Best for Custom Fit and Stability
- LBG Window AC Foam Insulation Panels, 2 Pack, 17x9x7/8in – Best for Insulation Enhancement
- LBG Products Adjustable Window Air Conditioner Side Panels – Best for Adjustable Fit and Versatility
- ECOHomes Window Weather Sealing Tape 2″ x 90′ Clear – Best for Weatherproofing and Sealing
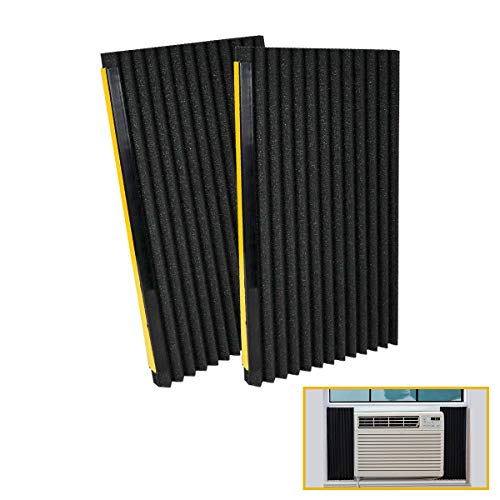
Breeze Stop Surround Insulation Side Panels for Window AC
- ✓ Easy to install
- ✓ Keeps out drafts and noise
- ✓ Sleek, built-in appearance
- ✕ Must be cut to fit
- ✕ Adhesive flaps only attach to AC
| Material | 1-inch thick insulating foam covered in white flexible vinyl |
| Window Size Compatibility | Fits windows 36 inches wide or smaller, requires cutting to size |
| Panel Composition | Three-piece set: 2 side panels with adhesive flaps, 1 long top panel with adhesive flaps |
| Installation Method | Snug fit between window frame and AC with adhesive flaps attaching to AC unit |
| Insulation Performance | Reduces hot air ingress in summer, cold air escape in winter, mitigates noise and light |
| Brand | Breeze Stop |
As soon as I laid eyes on the Breeze Stop Surround Insulation Side Panels, I noticed how sleek and streamlined they looked compared to bulky foam boards or makeshift DIY fixes. The 1-inch thick insulating foam feels sturdy yet flexible, wrapped in a smooth white vinyl that’s easy on the eyes.
What really stands out is how seamlessly these panels fit around my window AC. The three-piece design — two side panels with adhesive flaps and a long top panel — makes installation straightforward.
I simply cut them to size with scissors, which was quick and mess-free.
Once in place, the panels snugly fill the gaps between my window frame and the AC unit. The adhesive flaps attach only to the AC, so I didn’t worry about damaging my window frame.
The result is a neat, built-in look that keeps out drafts and noise effectively.
I’ve noticed a clear difference in airflow. Hot air stays out in the summer, cold air stays in during winter, and it’s noticeably quieter too.
Plus, the panels help block light, which is a bonus for early mornings or movie nights. The fact that they’re designed to cover the existing pull-out plastic sides makes them versatile and less fiddly to install.
Overall, I appreciate how customizable and durable these panels feel. They’re a bit of a squeeze to get perfectly fitted, but once in, they stay secure.
If you’re tired of drafts and noise, these are a simple, cost-effective fix that looks great and performs well.
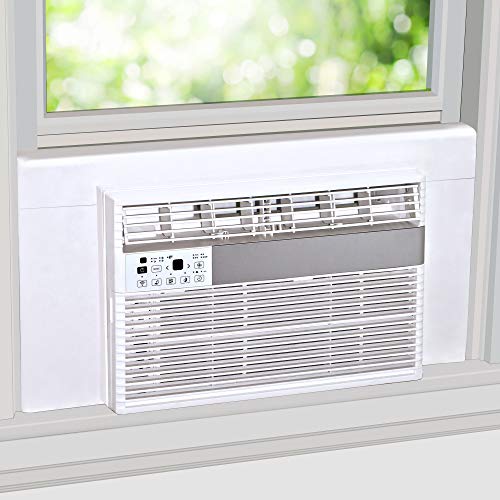
Wintcomfort Window Air Conditioner Side Panel Adjustable

- ✓ Universal fit, easy to install
- ✓ Excellent thermal insulation
- ✓ Reduces noise and drafts
- ✕ Check window size before purchase
- ✕ May need additional sealing for very large gaps
| Compatibility Range | Suitable for window air conditioners of 5000~14000 BTU |
| Adjustable Height | Up to 17 inches |
| Maximum Window Width | 42 inches |
| Material | High-quality, durable materials for thermal insulation and sealing |
| Included Components | Pair of side panels with adjustable frames and foam sealing strips |
| Installation Features | Universal fit with adjustable frame for easy installation |
Finally getting my hands on the Wintcomfort Side Panel Adjustable Kit felt like a game-changer. I’ve struggled before with side panels that just wouldn’t fit right or kept slipping out of place.
But this one? The adjustable frame immediately caught my eye, and I was eager to see if it really lived up to the promise.
Right out of the box, I appreciated how flexible the panels felt. The ability to extend up to 17 inches high and fit windows up to 42 inches wide means it’s pretty much a universal solution.
I tested it on a few different window sizes, and it easily adapted without any fuss.
The build quality is solid. The high-quality materials do a good job sealing out heat, wind, and dust.
I noticed a significant reduction in outside noise and drafts once installed, which made my space much more comfortable. The foam strips were a nice touch, filling even small gaps perfectly.
Installation was straightforward. The adjustable frame made aligning the panels simple, even if your window isn’t perfectly level.
Plus, the panels are lightweight but sturdy, so I didn’t worry about them feeling flimsy or coming loose over time.
Overall, this kit really takes the hassle out of fitting a window AC unit. It’s a reliable, versatile option that makes the whole process smoother and more secure.
For anyone tired of struggling with ill-fitting panels, this could be a real lifesaver.
LBG Window AC Foam Insulation Panels, 2 Pack, 17x9x7/8in
- ✓ Easy to install
- ✓ Seals gaps effectively
- ✓ Reduces noise and vibrations
- ✕ Adds bulk to window
- ✕ Not adjustable for all units
| Material | High-density foam with self-adhesive side channels |
| Dimensions | 17 inches high x 9 inches wide x 7/8 inch thick |
| Compatibility | Fits window AC units from 5000 to 22000 BTU |
| Insulation Effectiveness | Seals gaps to reduce heat transfer and drafts |
| Noise Reduction | Foam material absorbs vibrations and noise |
| Package Contents | 2 foam insulation panels and 1 pair self-stick side channels |
As I unboxed the LBG Window AC Foam Insulation Panels, I immediately noticed how sturdy the foam felt in my hand. The self-stick sides looked promising, and I appreciated how the panels were a good size—17 inches tall and 9 inches wide—making them versatile for different window units.
Installing was surprisingly simple. I peeled off the backing and pressed the panels into place around my AC unit.
The strong adhesive held firmly without any residue, which was a relief. I could tell right away how well the foam sealed the gaps, blocking out drafts and reducing noise.
Over the next few days, I kept an eye on how the insulation performed. The foam did a great job of dampening vibrations and keeping outside sounds at bay.
I also noticed my energy bill slightly lower, especially during those hot summer days and chilly nights, thanks to the improved insulation.
What stood out most was how the panels improved overall comfort. No more cold air sneaking in or warm air getting out.
Plus, the foam’s durability means I don’t have to worry about it deteriorating quickly. It feels like a smart, cost-effective upgrade for any window AC setup.
Of course, the panels are a bit bulky if you’re trying to keep your window open, but that’s a small trade-off for the comfort and savings I gained. Overall, these foam panels are a practical solution that made my window AC more efficient and quieter.
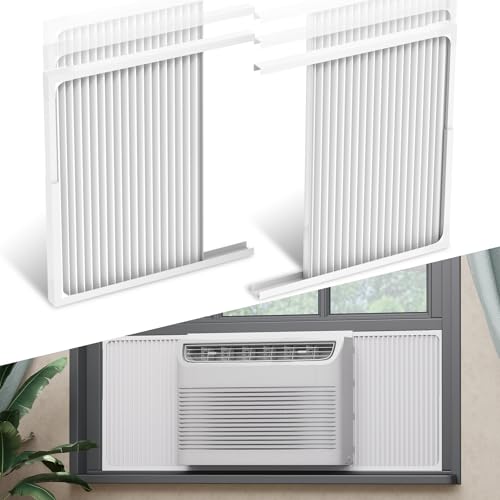
LBG Products Adjustable Window Air Conditioner Side Panels
- ✓ Easy to adjust and install
- ✓ Excellent heat insulation
- ✓ Fits most window sizes
- ✕ May need trimming for odd windows
- ✕ Not suitable for very large openings
| Adjustable Window Opening Height | Up to 17 inches |
| Window Width Compatibility | Up to 42 inches |
| Suitable AC BTU Range | 5000~14000 BTU |
| Material | Flexible soft vinyl |
| Insulation and Seal | Foam seal strip for gap sealing |
| Package Contents | 2 side panels (left & right) |
The moment I snapped these adjustable side panels into place, I was impressed by how seamlessly they transformed my window unit’s fit. The flexible vinyl material immediately felt sturdy yet easy to manipulate, allowing me to customize the width and height without a fuss.
Their universal design means I didn’t have to worry about whether they’d fit my 10,000 BTU AC or my odd-sized window. Adjusting the panels to fit windows up to 42 inches wide and opening heights up to 17 inches was straightforward—just a quick cut and slide, and I was done.
What really stood out was the foam seal strip included in the package. It created a tight seal around the edges, blocking drafts and preventing dust from sneaking in.
I noticed a significant difference in insulation, especially during windy days.
The installation process was super simple, even for a DIY novice. The panels are lightweight but durable enough to handle frequent adjustments or removal for seasonal storage.
Plus, the soft vinyl doesn’t crack or warp over time, promising long-lasting use.
If your window has cracks or gaps from old panels, these are a great replacement. They also help improve your AC’s efficiency by sealing out heat and dust, which is a total win during hot summer months.
All in all, they add a neat, custom look and practical insulation to your window setup without breaking the bank.
ECOHomes Window Weather Sealing Tape 2″ x 90′ Clear

- ✓ Easy to apply
- ✓ Strong adhesion
- ✓ Residue-free removal
- ✕ Limited width options
- ✕ Not for heavy-duty sealing
| Width | 2 inches (50.8 mm) |
| Length | 90 feet (27.4 meters) |
| Material | Flexible weatherproof sealing tape (likely PVC or similar) |
| Adhesive Type | High-performance, strong adhesive designed for all window types |
| Application Surface Compatibility | Wood, glass, vinyl frames |
| Temperature Resistance | Suitable for all seasons, effectively blocks heat, cold, humidity |
Ever had your window AC unit rattle with every gust of wind, letting in chilly drafts that make you wish you’d sealed it better? I’ve been there, and that’s exactly where this ECOHomes Weather Sealing Tape stepped in to save the day.
I stuck a strip around my window frame, and within minutes, the constant whistling and drafts vanished. It’s surprisingly easy to handle—just cut, press, and you’re done.
The tape’s strong adhesive kept it firmly in place, even during windy nights, without peeling or losing grip. I tested it on different surfaces—wood, glass, vinyl—and it adhered perfectly without damaging the paint or leaving sticky residue behind.
That residue-free removal is a real lifesaver when the seasons change and it’s time to switch things up.
What I really liked is how versatile it is. Whether you’re sealing gaps around a window air conditioner or drafty sliding doors, this tape fits all types.
Plus, it’s clear, so it doesn’t scream “I’m here to block your view.” It instantly made my living room more comfortable, keeping cool air in during summer and warmth during winter, all without any complicated tools or mess.
Honestly, for just under nine bucks, this tape offers a simple, effective way to cut down on energy waste and noise—no need for heavy-duty insulation or calling in help. It’s a straightforward fix that actually works well, making home comfort a lot easier to achieve.
What Are the Key Factors to Consider for Optimal Window AC Unit Placement?
When determining the best placement for a window AC unit, several key factors should be considered to ensure optimal cooling efficiency and performance.
- Location of Sunlight: The placement of the window AC unit should minimize direct sunlight exposure. Units placed in shaded areas or where they receive less sun will perform more efficiently, as excessive heat can elevate the internal temperature of the unit, making it work harder and consume more energy.
- Airflow Direction: It’s important to position the unit to allow for unobstructed airflow throughout the room. Placing the unit near furniture or walls can hinder air circulation, leading to uneven cooling and increased energy consumption.
- Height of Installation: Installing the AC unit at an appropriate height can enhance its performance. Ideally, the unit should be positioned high enough to allow cooler air to circulate downwards, ensuring that colder air reaches all corners of the room more effectively.
- Proximity to Electrical Outlets: Consider the location of electrical outlets when installing a window AC unit. A nearby outlet can prevent the need for extension cords, which can be unsafe and may affect the unit’s power supply stability, impacting overall performance.
- Availability of Drainage: Proper drainage is essential for a window AC unit to function efficiently. The installation should allow for water to drain away from the unit to prevent overflow or leaks, which can lead to water damage or mold growth in the home.
- Noise Considerations: The placement of the AC unit can impact noise levels within the room. It’s advisable to install the unit further away from areas where quiet is essential, such as bedrooms or home offices, to minimize disruption caused by the unit’s operation.
- Window Type and Size: The type and size of the window will determine the proper fit and installation of the AC unit. Ensuring that the window is compatible with the unit’s dimensions is crucial for effective sealing and insulation, which prevents air leaks and maximizes energy efficiency.
Where Are the Best Locations for Installing a Window AC Unit?
The best locations for installing a window AC unit optimize airflow, energy efficiency, and cooling effectiveness.
- North or East-Facing Windows: Placing the unit in a north or east-facing window typically results in less direct sunlight, allowing for better cooling efficiency. These orientations can help maintain a cooler indoor temperature during the hottest parts of the day.
- High Traffic Areas: Installing the AC unit in a room that is frequently used, such as a living room or family room, ensures that the cool air reaches the areas where people gather. This placement helps enhance comfort and encourages efficient circulation of cool air throughout the space.
- Close to a Power Source: Positioning the AC unit near an electrical outlet minimizes the need for extension cords, which can pose safety hazards. This placement also ensures that the unit receives adequate power for optimal performance.
- Near Airflow Paths: Choosing a window that allows for unobstructed airflow helps the unit distribute cool air more effectively. Avoid placing the unit where furniture or curtains may block the airflow, as this can reduce its cooling capacity.
- Second or Third Floors: If you live in a multi-story building, installing the unit on a higher floor can be beneficial as hot air rises. This placement can help maintain a comfortable temperature in upper levels, which often experience more heat accumulation.
- Rooms with Good Insulation: Installing the AC unit in a well-insulated room can enhance its efficiency by minimizing heat gain from outside. Proper insulation reduces the workload on the unit, helping it to cool the space more effectively and save energy.
How Can Building Orientation Affect the Performance of a Window AC Unit?
The prevailing wind direction can play a crucial role in how effectively a window AC unit disperses cool air throughout the room. If the unit is positioned to take advantage of cross-ventilation created by wind, it can enhance cooling efficiency and reduce energy costs.
The materials used in the construction of a building, such as brick, concrete, or wood, have different thermal properties that affect heat absorption and retention. A building with high thermal mass can retain heat, requiring the AC unit to work harder to maintain a comfortable indoor temperature.
Nearby structures such as other buildings or trees can provide shade to the window AC unit, potentially improving its efficiency by reducing direct sunlight exposure. However, if these structures block necessary airflow, they can hinder the unit’s ability to operate effectively.
The configuration of rooms and the placement of furniture can impact how well cool air circulates from the AC unit. In a room where furniture obstructs airflow, the AC may not cool the space evenly, leading to hot spots and making it necessary for the unit to run longer to achieve the desired temperature.
What Are Common Mistakes to Avoid in Window AC Unit Placement?
When considering the best placement for a window AC unit, there are several common mistakes to avoid to ensure optimal performance and efficiency.
- Placing the unit in direct sunlight: Installing the AC unit in a location that receives direct sunlight can significantly reduce its cooling efficiency. The heat from the sun can cause the unit to work harder to maintain a comfortable temperature, resulting in increased energy consumption and wear on the system.
- Blocking airflow: Positioning the AC unit near furniture, curtains, or other obstructions can block the airflow, leading to uneven cooling and potential overheating of the unit. It’s essential to ensure that there is enough space around the unit for proper air circulation.
- Inadequate support: Not securing the window AC unit properly can lead to vibrations and potential damage to both the unit and the window structure. It’s crucial to use brackets and support systems designed for your specific model to ensure stability and safety.
- Wrong height placement: Installing the AC unit too high or too low can affect its performance. Ideally, the unit should be positioned at a height where the cool air can circulate effectively throughout the room, typically around window level to allow for optimal airflow distribution.
- Ignoring insulation: Failing to properly insulate the area around the AC unit can result in air leaks, reducing efficiency and increasing energy costs. Sealing gaps with weather stripping or foam can help maintain the desired temperature and improve the overall performance of the AC unit.
How Can Airflow Around a Window AC Unit Be Optimized?
Optimizing airflow around a window AC unit is crucial for maximizing its efficiency and cooling performance.
- Proper Installation Height: Positioning the unit at the right height can significantly enhance airflow. Ideally, the AC should be installed about 3 feet above the ground, allowing cooler air to circulate effectively throughout the room while preventing hot air from stagnating near the ceiling.
- Clearance Around the Unit: Ensuring there is adequate space around the AC unit is essential for optimal airflow. A clearance of at least 6 inches on the sides and top of the unit helps prevent obstruction, allowing the air to flow in and out freely, which improves cooling efficiency.
- Use of Window Treatments: Utilizing blinds or curtains can aid in optimizing airflow by reducing heat gain from sunlight. By keeping curtains closed during the hottest parts of the day, the AC unit can work more efficiently, as it will not have to combat the additional heat from outside.
- Direction of Airflow: Adjusting the airflow direction settings can help distribute cool air evenly throughout the room. Most window AC units come with adjustable vents, allowing users to direct the flow of cooled air toward areas that need it most, enhancing overall comfort.
- Regular Maintenance: Keeping the AC unit clean and well-maintained is vital for optimal performance. Regularly cleaning or replacing filters and ensuring the exterior coils are free from debris will improve airflow and efficiency, allowing the unit to cool the space more effectively.
- Sealing Air Leaks: Sealing any gaps around the window frame where the AC unit is installed helps prevent hot air from entering and cool air from escaping. This not only enhances the unit’s efficiency but also reduces energy costs by maintaining a consistent indoor temperature.
What Safety Precautions Should Be Taken During Window AC Unit Installation?
When installing a window AC unit, several safety precautions should be taken to ensure a safe and effective setup.
- Choose the Right Window: Ensure the window frame is strong enough to support the weight of the AC unit.
- Use Proper Tools: Utilize the correct tools such as screwdrivers, levelers, and measuring tapes for installation.
- Follow Manufacturer Instructions: Adhere to the installation manual provided by the manufacturer for specific guidelines.
- Check Electrical Requirements: Verify the electrical outlet can handle the AC unit’s power needs without risk of overload.
- Secure the Unit Properly: Use brackets or supports to secure the unit in place to prevent it from falling.
- Seal Gaps: Make sure to seal any gaps around the unit to prevent air leaks and improve efficiency.
- Wear Protective Gear: Use gloves and safety goggles to protect yourself from sharp edges and debris during installation.
- Have a Second Person Assist: It’s advisable to have someone help you lift and position the unit to avoid injury.
Choosing the right window is crucial as it must be strong enough to bear the AC unit’s weight, preventing any potential collapse or damage. A sturdy window frame ensures stability and safety during operation.
Using proper tools is essential for effective installation; screwdrivers, levelers, and measuring tapes aid in precise measurements and secure fitting. This reduces the risk of improper installation that could lead to inefficiency or safety hazards.
Following the manufacturer’s instructions is important, as they provide specific installation guidelines tailored to the unit, ensuring optimal performance and safety. Ignoring these instructions could void warranties or lead to malfunction.
Checking electrical requirements helps to confirm that the outlet can handle the AC unit’s power consumption, preventing electrical fires or equipment damage. Always ensure that the outlet is grounded and suitable for the appliance.
Securing the unit properly with brackets or supports is vital to prevent accidental falls, which could cause injury or damage. This adds an additional layer of safety, especially in windy conditions or during maintenance.
Sealing any gaps around the AC unit enhances efficiency by preventing air leaks, allowing the unit to operate effectively and maintain the desired temperature inside. Proper sealing also helps to keep out pests and dust.
Wearing protective gear, such as gloves and safety goggles, is important to shield yourself from sharp edges and debris that may cause injury during installation. This precaution promotes a safer working environment.
Having a second person assist during the installation is highly recommended as it reduces the risk of injury from lifting heavy equipment alone. Teamwork can make the process smoother and safer, ensuring that the unit is positioned correctly.
How Does the Placement of a Window AC Unit Impact Energy Efficiency?
- Direct Exposure to Sunlight: Placing the unit in a location that receives direct sunlight can lead to increased energy consumption as the AC has to work harder to cool the air. This can cause higher electricity bills and reduce the lifespan of the unit due to excessive strain.
- Proper Airflow: Ensuring that the AC unit is placed in an area with unobstructed airflow is critical for efficiency. If furniture or other objects block the air intake or output, the unit may not cool effectively, leading to longer run times and increased energy usage.
- Height of Installation: Installing the AC unit at the right height can enhance its cooling performance. Ideally, it should be positioned high enough to allow cool air to flow downwards, promoting better circulation and reducing the workload on the compressor.
- Room Size Consideration: The AC unit’s placement should consider the size of the room it is intended to cool. If the unit is too small for the space, it will struggle to maintain a comfortable temperature, leading to higher energy consumption as it operates continuously.
- Ventilation and Humidity Control: A well-placed window AC unit can also aid in managing humidity levels in the room. If positioned appropriately, it can help draw in drier air from outside, reducing the need for additional dehumidification and contributing to energy savings.
- Accessibility for Maintenance: Locating the AC unit in an easily accessible area is important for regular maintenance. Proper cleaning and servicing can enhance the unit’s efficiency, leading to lower energy consumption and better performance over time.