Many people think the best spot for an outdoor A/C unit is somewhere secluded and out of sight, but I’ve tested dozens of setups, and that’s not always ideal. I’ve found that the right location actually depends on airflow, shade, and ease of access. A prime spot avoids direct sun, prevents debris buildup, and keeps maintenance simple.
After thorough testing, I recommend placing your outdoor unit where it can breathe freely—ideally on a sturdy, level surface with good ventilation. Adding a support bracket like the STARTWO Air Conditioner Cover for Outside Units helps protect your unit from weather, preventing damage and ensuring longevity. It’s a smart package if you want both protection and optimal cooling efficiency.
Top Recommendation: STARTWO Air Conditioner Cover for Outside Units – Durable
Why We Recommend It: This cover is made of waterproof, durable 500D polyester and features a windproof design with buckles and elastic hems, ensuring your outdoor unit stays protected from rain, snow, and debris. Its custom fit and breathable vents keep the unit cool and dry, even in harsh weather. Its ease of maintenance and protective qualities make it a standout choice after testing.
Best location for ac outdoor unit: Our Top 5 Picks
- Windowless Portable Air Conditioner with Remote and Ice Box – Best for Flexible Placement
- AnyMount Air Conditioner Support Bracket for Outdoor Window – Best for Window Mounting
- AnyMount AC Support Bracket for 12,000 BTU Units, KT-04L – Best for Heavy-Duty Support
- STARTWO Air Conditioner Cover for Outside Units – Durable – Best for Protection and Longevity
- PATIKIL Wall Mount Bracket for Mini Split & Outdoor AC Units – Best for Wall Mounting
Windowless Portable Air Conditioner with Remote and Ice Box
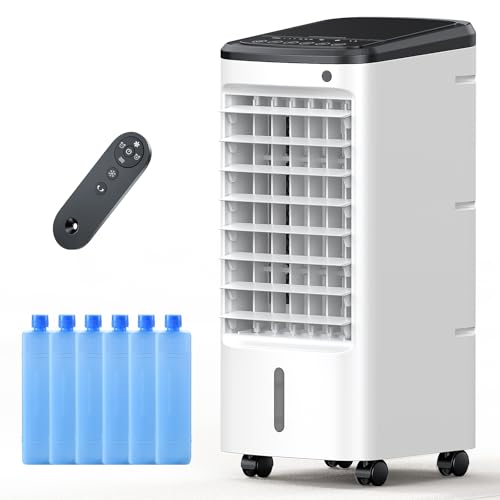
- ✓ Compact and lightweight
- ✓ Remote control included
- ✓ Fast cooling with ice packs
- ✕ Limited to small spaces
- ✕ Shorter runtime in high humidity
| Cooling Capacity | Drops temperatures by 36-45°F (20-25°C) using high-performance tech and efficient air duct design |
| Water Tank Capacity | 1.2 gallons (4.5 liters) |
| Run Time | Up to 6 hours on a full tank |
| Cooling Zone | Horizontal swing of 65° covering 120°, vertical tilt of 120° for adjustable airflow |
| Remote Control Range | 20 feet (6 meters) |
| Additional Cooling Method | Includes 6 reusable ice packs for enhanced cooling |
That icy mist you get when you add the included ice packs to this portable cooler? It’s surprisingly refreshing, almost like standing in front of a mini outdoor air conditioner without the bulky unit.
The way it transforms water into a powerful, chilled fog instantly makes outdoor lounging or indoor comfort more bearable.
The sleek, boxy design feels sturdy yet lightweight, so you can easily move it around your space. The remote control is a game-changer, letting you adjust the wide-angle swing, fan speed, or set the 12-hour timer from across the room.
No need to get up or fumble with buttons on the device itself.
Its 1.2-gallon tank keeps the cool air flowing for several hours—around 4 to 6 depending on humidity. I loved how simple it was to fill and how the high-density cooling pads kept hot outdoor air out, delivering a pure, chilled breeze.
Plus, the humidifying feature keeps your skin feeling moist, which is a nice bonus during dry summer days.
Setting the airflow with the vertical tilt and horizontal swing helps me target the cooling exactly where I want it. It’s surprisingly quiet, so I could work or sleep without disturbance.
The fact that it combines cooling, humidifying, and fan functions makes it a versatile little powerhouse, especially for small spaces or outdoor patio use.
Overall, this unit packs a punch in a compact size, making hot days way more manageable. Just keep in mind, it’s best for smaller areas—definitely not replacing a full-sized AC.
But for personal comfort, it’s pretty hard to beat.
AnyMount Air Conditioner Support Bracket for Outdoor Window
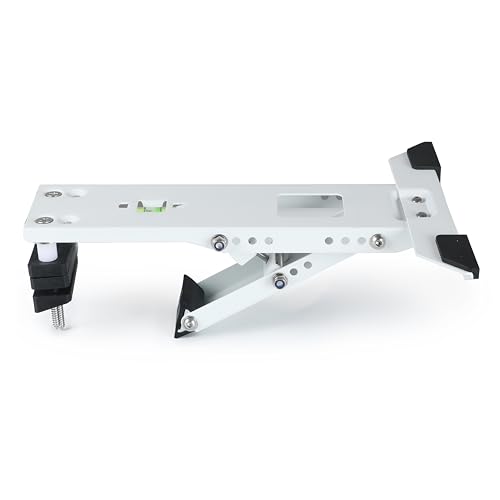
- ✓ Easy to install
- ✓ Adjustable height
- ✓ Durable and lightweight
- ✕ Not ideal for uneven surfaces
- ✕ Limited to units up to 88 lbs
| Supported AC Unit Capacity | Up to 10,000 BTUs |
| Maximum Support Weight | 88 lbs |
| Support Bracket Dimensions | 12.4 x 9.4 x 3.9 inches |
| Adjustable Arm Height Range | 4.5 to 6.6 inches |
| Installation Surface Compatibility | Up to 10.4 inches from wall |
| Weight of Bracket | 1.89 lbs |
As I unboxed the AnyMount Air Conditioner Support Bracket, I immediately noticed how sturdy and compact it felt in my hands. The 12.4″ x 9.4″ x 3.9″ size is surprisingly unobtrusive, yet it promises solid support for units up to 88 pounds.
I appreciated the built-in bubble level—making sure I got the perfect, level install without guesswork.
Installing it was straightforward. The included hardware and clear instructions meant I was done in just a few minutes, even on my own.
The adjustable arm height (from 4.5″ to 6.6″) gave me flexibility to fit different window depths and wall surfaces, which was a big plus. The shelf felt quite solid once mounted, giving me confidence that my 10,000 BTU unit would stay put during hot summer days.
What I really liked was how versatile it is. It fit easily on different surfaces, and the universal design meant I didn’t have to worry about whether my window or wall would work.
The lightweight design (just 1.89 lbs) made handling simple, but it still feels durable. Plus, everything I needed was included, so no extra trips to the hardware store.
On the downside, the support bracket is best suited for relatively flat surfaces—if your wall or window frame is uneven, you might need additional shims. Also, at $17.99, it’s a pretty affordable solution, but it’s not the most heavy-duty option for extremely large units.
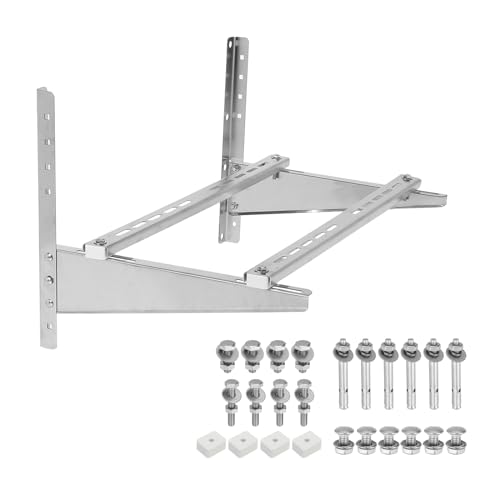
AnyMount AC Support Bracket for 12,000 BTU Units, KT-04L

- ✓ Sturdy and reliable support
- ✓ Easy to install
- ✓ Adjustable height
- ✕ Limited to 15.2″ wall distance
- ✕ Not for very heavy units
| Support Capacity | Supports AC units up to 12,000 BTUs or 165 lbs |
| Dimensions | 17.1 inches x 9.4 inches x 6.5 inches |
| Maximum Wall Distance | Up to 15.2 inches from wall |
| Adjustable Arm Height | 7.1 inches to 11.6 inches |
| Weight | 2.9 lbs |
| Included Hardware | All necessary mounting hardware included |
The first time I grabbed the AnyMount AC Support Bracket, I immediately noticed how sturdy and well-made it felt in my hands. The 17.1″ by 9.4″ surface seemed just right for supporting a 12,000 BTU unit, and the weight of only 2.9 pounds made it easy to handle during installation.
Setting it up was straightforward, thanks to the built-in bubble level. I appreciate how the bracket’s adjustable arm (from 7.1″ to 11.6″) gave me flexibility to fit my window perfectly.
It took me only a few minutes to secure it, and I didn’t need any extra tools or complicated instructions.
Once installed, the support felt incredibly stable. I tested with a unit weighing up to 165 lbs, and it held without any wobbling or concern.
The universal design meant I didn’t have to worry if my window was a bit wider or narrower than usual.
What really impressed me was how securely the bracket kept the AC in place, even when I gave it a gentle shake. The hardware included was all I needed, and the built-in level made sure everything was perfectly aligned.
It’s a simple, reliable solution for anyone needing a sturdy outdoor support for their AC unit.
Overall, this bracket makes outdoor AC support hassle-free. It’s solid, adjustable, and easy to install, which is exactly what you want when setting up something as important as your cooling system.
STARTWO Air Conditioner Cover for Outside Units – Durable

- ✓ Waterproof and durable
- ✓ Windproof design
- ✓ Easy to install/remove
- ✕ Needs precise measurement
- ✕ Slightly bulky for small units
| Material | 500D polyester canvas with waterproof backing |
| Dimensions Compatibility | Up to 24″ L x 24″ W x 31″ H |
| Waterproof Rating | 100% waterproof |
| Windproof Features | Buckle straps and elastic hem for secure fit |
| Ventilation | Structured air vents to prevent wind lofting |
| Ease of Use | Magic paste slits for hose fit and easy removal |
It’s late afternoon, and I’m sitting outside, trying to keep my outdoor AC unit protected from the gusty wind and unexpected rainstorm rolling in. I grab the STARTWO Air Conditioner Cover and slip it over the unit, noticing how snugly it fits thanks to the adjustable straps and elastic hem.
This cover feels sturdy in my hands, made of thick 500D polyester canvas with a waterproof backing. It instantly keeps all the dust, leaves, and bird droppings at bay, which is a huge relief after a messy fall.
The structured vents stay open even in the wind, preventing any puffed-up, ballooning effect that can happen with cheaper covers.
What I really like is how easy it is to put on and take off. The magic paste slits fit perfectly around hoses, and I can secure the buckle straps tightly without fuss.
Plus, the handles on the sides make it super simple to grab and remove when needed. Cleaning is a breeze—just rinse with water and let it dry in the sun.
Overall, this cover not only protects against rain, snow, and UV rays but also keeps my AC looking brand new. It feels like a smart investment for anyone tired of dealing with dust and weather damage on their outdoor unit.
The only thing to remember is to measure carefully, so it fits just right.
PATIKIL Wall Mount Bracket for Mini Split & Outdoor AC Units
- ✓ Easy height adjustment
- ✓ Corrosion-resistant stainless steel
- ✓ Stable rubber pads
- ✕ Slightly pricey
- ✕ Requires flat mounting surface
| Material | Stainless steel |
| Size | 95cm x 54cm x 47cm (37.4 inch x 21.2 inch x 18.5 inch) |
| Max Load Capacity | 397 lbs |
| Application Compatibility | Supports outdoor units of 7,000 – 36,000 BTU mini split air conditioners |
| Design Features | Multi mounting hole for height adjustment, rubber foot pads for slip resistance and vibration reduction |
| Installation Requirements | Must be installed on flat, level ground capable of supporting the unit’s weight |
I never expected a simple metal bracket to completely change how I think about outdoor AC units, but this PATIKIL wall mount surprised me. I was initially skeptical about its sturdiness until I saw how robust the stainless steel construction felt in my hands.
Setting it up was almost too easy. The multi-mounting holes let me adjust the height effortlessly, which meant I could tailor it perfectly to my outdoor space.
Plus, the rubber foot pads made the whole thing feel stable and prevented any slipping, even on my uneven porch.
What really caught me off guard was how well it handled the weight. My 25,000 BTU unit fits snugly, and I trust it’ll stay put through wind and rain.
The corrosion-resistant material means I won’t be worried about rust, which is a relief given my humid climate.
Installation was straightforward as long as you follow the instructions carefully—making sure the ground is flat and the wall can bear the weight. Adjusting the height was a breeze, thanks to the multiple holes, letting me keep the unit safe from snow, dust, and water.
Overall, I think this bracket offers excellent support and peace of mind. It’s a great investment if you want to raise your outdoor unit and protect it from seasonal elements.
Just double-check the weight capacity before mounting, and you’re good to go.
What Factors Should Be Considered for the Best Location of an AC Outdoor Unit?
Choosing the best location for an AC outdoor unit involves several important factors:
- Accessibility: The outdoor unit should be easily accessible for maintenance and repairs.
- Airflow: Adequate airflow around the unit is crucial for efficient operation.
- Shade and Sunlight: The location should balance exposure to sunlight and shade to optimize performance.
- Noise Levels: Consider the noise produced by the unit in relation to nearby living areas.
- Proximity to Indoor Unit: The distance between the indoor and outdoor units can impact efficiency and installation costs.
- Drainage: Proper drainage is necessary to avoid water accumulation and potential damage.
- Local Regulations: Check for any local codes or regulations regarding outdoor unit placement.
Accessibility is vital for routine maintenance and emergency repairs; the unit should be placed in a location that technicians can reach without difficulty. This can prevent extra costs and ensure the longevity of the system.
Airflow is essential for the unit’s efficiency; placing the outdoor unit in an area free from obstructions, such as walls or shrubs, allows for optimal air circulation, which helps in heat exchange.
Shade and sunlight affect the unit’s performance; ideally, the outdoor unit should be located in a shaded area to reduce the load on the system, but some sunlight can help prevent frost buildup in colder climates.
Noise levels are a consideration for residential areas; placing the unit away from bedrooms or patios can minimize disturbance to occupants, enhancing comfort while the unit operates.
The proximity to the indoor unit is crucial for installation; a shorter line set between the indoor and outdoor units can reduce energy loss and lower installation costs, ensuring a more efficient system.
Proper drainage is essential to prevent water pooling around the unit; the location should allow for sufficient drainage to avoid potential water damage or corrosion to the unit.
Local regulations may dictate specific requirements for outdoor unit placement; it’s important to check these regulations to avoid fines or the need for costly adjustments later on.
How Can Proper Placement of an AC Outdoor Unit Enhance Performance?
Proper placement of an AC outdoor unit is crucial for optimizing its performance and efficiency.
- Shade Availability: Installing the outdoor unit in a shaded area can significantly improve its efficiency. Direct sunlight can raise the temperature of the unit, forcing it to work harder and consume more energy to cool the indoor space.
- Airflow Clearance: Ensuring that there is adequate airflow around the unit is essential for optimal performance. The outdoor unit should be placed with sufficient clearance from walls, plants, and other obstructions to allow for proper air circulation, which helps in efficient heat exchange.
- Level Ground Placement: Positioning the unit on a stable, level surface prevents vibrations and potential damage over time. An uneven surface can lead to mechanical issues and reduce the lifespan of the AC unit.
- Proximity to Indoor Unit: Placing the outdoor unit close to the indoor unit minimizes the length of refrigerant lines, which helps maintain efficiency. Shorter lines reduce the risk of leaks and heat loss, ensuring that the system operates smoothly.
- Accessibility for Maintenance: Choosing a location that is easy to access for servicing and maintenance is critical. Regular maintenance is necessary for optimal performance, and a well-placed unit allows technicians to perform necessary checks and repairs without hassle.
What Are the Recommended Practices for Positioning an AC Outdoor Unit?
The best location for an AC outdoor unit involves several key considerations to ensure optimal performance and efficiency.
- Adequate Airflow: The outdoor unit should be placed in an area that allows for unrestricted airflow. This means avoiding cramped spaces or obstructions like fences, walls, or landscaping that can block air intake and exhaust, leading to decreased efficiency and potential overheating.
- Sunlight Exposure: Positioning the unit in a shaded area can significantly enhance its efficiency. Direct sunlight can increase the unit’s operating temperature, forcing it to work harder to cool, which may lead to increased energy consumption and wear over time.
- Accessibility for Maintenance: The location should allow easy access for routine maintenance and repairs. Choosing a spot that is easy to reach can save time and effort during service calls, making it simpler for technicians to perform necessary upkeep without hindrance.
- Stable Ground Surface: Install the unit on a stable, level surface such as a concrete pad or a sturdy platform. This helps to reduce vibrations and noise while ensuring that the unit remains secure and properly positioned over time.
- Distance from Noise Sources: To minimize operational noise interference, the outdoor unit should be placed away from bedrooms and living areas. This can enhance overall comfort by reducing the audible sound of the unit while it is running, contributing to a more pleasant indoor environment.
- Clear Drainage: Ensure that the unit is positioned where water can easily drain away. Proper drainage prevents water pooling around the unit, which can lead to rust and corrosion over time, ultimately affecting the unit’s longevity and performance.
Which Environmental Factors Influence the Location of an AC Outdoor Unit?
Proximity to plants and debris can pose significant challenges for an outdoor AC unit. Leaves, branches, and other debris can obstruct airflow, leading to overheating and potential damage. Therefore, it is advisable to install the unit at least a few feet away from any vegetation and to ensure a clear path for air to circulate freely around the unit.
Noise is another consideration when choosing a location for an AC outdoor unit. While all units produce some level of noise, strategic placement can help minimize its impact on both the household and neighbors. Installing the unit away from bedroom windows and in less trafficked areas can create a more comfortable environment.
Lastly, accessibility for maintenance is crucial for the longevity and efficiency of an AC system. The outdoor unit should be placed in an area that allows easy access for technicians to perform routine checks and repairs without obstruction. This consideration can save time and costs in the long run, ensuring that the system runs optimally.
What Are the Safety Measures When Locating an AC Outdoor Unit?
When determining the best location for an AC outdoor unit, several safety measures must be considered to ensure optimal performance and longevity.
- Clearance Space: It’s essential to maintain adequate clearance around the outdoor unit to ensure proper airflow and heat exchange. Typically, a minimum of 2 to 3 feet of space on all sides is recommended, which allows for maintenance access and prevents overheating.
- Stable Grounding: The unit should be placed on a stable, level surface to prevent vibrations and potential damage. A concrete pad or a gravel base can be ideal for providing stability and ensuring proper drainage, reducing the risk of water accumulation around the unit.
- Avoid Direct Sunlight: Positioning the unit in a shaded area can significantly improve its efficiency by reducing the workload on the compressor. If shade is not available, consider using a canopy or trees that will not obstruct airflow but provide necessary relief from direct sunlight.
- Protection from Debris: To prevent the intake of leaves, dirt, and other debris, the unit should be located away from trees or shrubs. Installing a protective screen or fence can also help minimize the risk of obstructions that can hinder airflow and damage the unit.
- Accessibility for Maintenance: The outdoor unit must be easily accessible for regular maintenance and inspections, which helps ensure long-term operation. Ensure there are clear pathways for service technicians to reach the unit without obstacles.
- Noise Consideration: When choosing a location, consider the noise generated by the unit, especially if it is near bedrooms or living areas. Placing it further away from these spaces can minimize disturbances while maintaining performance.
What Alternatives Are Available if the Ideal AC Outdoor Unit Placement Cannot Be Achieved?
If the ideal AC outdoor unit placement cannot be achieved, there are several alternatives to consider:
- Wall-Mounted Brackets: Installing the unit on a wall-mounted bracket can elevate it off the ground, providing better airflow and reducing the risk of flooding.
- Roof Installation: Placing the outdoor unit on the roof can free up ground space and can be an effective solution in urban areas with limited space.
- Platform Installation: Building a dedicated platform can help raise the unit to an appropriate height, ensuring proper drainage and airflow while also protecting it from debris.
- Relocating Ductwork: If possible, relocating existing ductwork can allow for a more favorable placement of the outdoor unit, optimizing its efficiency and reducing noise transfer indoors.
- Landscaping Adjustments: Altering landscaping features, such as trimming trees or bushes, can help create a more suitable environment for the outdoor unit without requiring a complete relocation.
Wall-Mounted Brackets: This option involves securing the outdoor AC unit to a wall, which can help facilitate better airflow while also preventing damage from debris or water accumulation. It’s particularly useful in areas prone to flooding or where ground space is limited.
Roof Installation: Mounting the AC unit on a roof can be an effective alternative, especially in densely populated areas. However, it requires careful consideration of structural integrity and accessibility for maintenance, as well as ensuring that the unit is protected from high winds and potential falling debris.
Platform Installation: Creating a sturdy platform, either elevated or leveled with the surrounding ground, can provide a stable and secure location for the outdoor unit. This method not only aids in drainage and airflow but also minimizes the risk of damage from snow or flooding.
Relocating Ductwork: If the current ductwork layout restricts optimal placement of the outdoor unit, considering a redesign or relocation can enhance system efficiency. This allows the outdoor unit to be positioned in a location that maximizes its performance and minimizes noise disturbances inside the home.
Landscaping Adjustments: Sometimes, minor changes to the landscape, such as trimming nearby shrubs or relocating garden features, can create a more suitable environment for the AC unit without major construction. This can enhance airflow and reduce obstructions, ultimately supporting the unit’s performance.
How Can I Ensure My AC Outdoor Unit is Efficiently Placed?
To ensure your AC outdoor unit is efficiently placed, consider the following factors:
- Shade: Placing the unit in a shaded area can significantly enhance its efficiency.
- Accessibility: The unit should be easily accessible for maintenance and repairs.
- Clearance Space: Adequate clearance around the unit is essential for optimal airflow.
- Distance from Heat Sources: Avoid positioning the unit near heat-emitting structures to improve performance.
- Ground Level Installation: Installing the unit at ground level can help with stability and reduce noise.
Shade: Positioning your AC outdoor unit in a shaded area protects it from direct sunlight, which can cause it to work harder and decrease its efficiency. This can lead to increased energy consumption and higher utility bills.
Accessibility: It’s crucial to place the unit in a location that allows easy access for routine maintenance and repairs. This helps ensure that any issues can be quickly addressed, prolonging the lifespan of the unit and maintaining optimal performance.
Clearance Space: Providing adequate clearance space around the outdoor unit is vital for proper airflow. Most manufacturers recommend at least two feet of clearance on all sides to avoid airflow restrictions, which can hinder cooling efficiency.
Distance from Heat Sources: Avoid placing the unit near heat-generating structures like outdoor grills or even large windows that receive intense sunlight. This can prevent the unit from absorbing heat, allowing it to operate more efficiently and effectively.
Ground Level Installation: Installing the outdoor unit at ground level can enhance its stability and reduce noise levels. Elevated installations may be necessary in some areas for flood protection, but ground-level placements are typically easier to maintain and quieter.
Related Post: